3 - Vertical Slice
In this chapter we'll build our first application feature. We'll follow the practice of outside-in test driven development: write a failing end-to-end test, watch it fail, then build out the functionality with unit tests using multiple inner red-green-refactor cycles. We'll also see the principle of "write the code you wish you had" in action.
In the last chapter we made it through a number of stories in Trello, each involving application setup. Our next story in Trello is the first one that involves building an application feature: "List Restaurants". Drag it to "In Progress".
We chose this story as our first feature story because it allows us to build out a vertical slice of our application. It touches all layers of our code: it has a user interface aspect (the list screen), a data layer aspect (where the restaurants are loaded and stored), and an API client aspect (the HTTP request to load the restaurants). It also minimizes other work: we aren't building authentication now, and we aren't handling restaurant loading edge cases yet in this story. The point of a vertical slice is to get something built out that touches all the layers of your application. This ensures that all the layers work together, and it provides a framework for adding in future features.
Setup
We'll do all our work from this feature on a branch. Create a new one:
$ git checkout -b list-restaurants
To get a clean start, let's delete out the sample content Create React App created with our app. Delete the following files and folders:
cypress/integration/smoke.spec.jssrc/App.csssrc/App.test.jssrc/index.csssrc/logo.svgsrc/reportWebVitals.js
Make the following changes to src/index.js:
 import React from 'react';
 import ReactDOM from 'react-dom';
-import './index.css';
 import App from './App';
-import reportWebVitals from './reportWebVitals';

const root = ReactDOM.createRoot(document.getElementById('root'));
root.render(
  <React.StrictMode>
    <App />
  </React.StrictMode>,
);
-
-// If you want to start measuring performance in your app, pass a function
-// to log results (for example: reportWebVitals(console.log))
-// or send to an analytics endpoint. Learn more: https://bit.ly/CRA-vitals
-reportWebVitals();
Replace the contents of App.js with the following minimal content:
export default function App() {
  return <div>Hello, world.</div>;
}
In public/index.html, find the <title> tag and see that the page has the default title "React App". Update it:
   Learn how to configure a non-root public URL by running `npm run build`.
   -->
-  <title>React App</title>
+  <title>Opinion Ate</title>
 </head>
Commit these changes to git:
$ git add .
$ git commit -m "Delete sample content"
Reviewing the Backend
This exercise will focus exclusively on our frontend codebase, so we won't be building the corresponding backend; we'll use one that has already been built. Let's take a look at that backend and see how we can load our restaurant data from it. It's accessible at https://api.outsidein.dev. Rather than using username-and-password authentication as we might do for a real system, for simplicity we'll just use an API key instead. This will allow you to access your own personal data on the server, so you can edit it without seeing or modifying others' data.
Go to https://api.outsidein.dev in a browser. Click the "Create API Key" button. You'll be given a new API key that is a random sequence of letters and numbers. Copy it and save it someplace safe—you won't be able to get back to it again.
Next, go to https://api.outsidein.dev/YOUR-API-KEY/restaurants in a browser, filling in your API key in place of YOUR-API-KEY. You should see the following JSON data, including a few default restaurants that were created when your API key was created. It may be formatted differently depending on your browser and extensions, and the IDs will differ:
[
  {
    "id": 1,
    "name": "Pasta Place"
  },
  {
    "id": 2,
    "name": "Salad Place"
  }
]
This is the web service endpoint our first story will use; we'll send a GET request to retrieve the list of restaurants.
You can also send a POST request to that endpoint to create a new restaurant. The API web site provides details on how that works; feel free to try it out if you like.
Now, to start building the frontend.
End-to-End Test
When performing outside-in TDD, our first step is to create an end-to-end test describing the feature we want users to be able to do.
In the cypress/integration folder, create a listing-restaurants.spec.js file and add the following:
describe('Listing Restaurants', () => {
  it('shows restaurants from the server', () => {
    const sushiPlace = 'Sushi Place';
    const pizzaPlace = 'Pizza Place';

    cy.intercept('GET', 'https://api.outsidein.dev/*/restaurants', [
      {id: 1, name: sushiPlace},
      {id: 2, name: pizzaPlace},
    );

    cy.visit('/');
    cy.contains(sushiPlace);
    cy.contains(pizzaPlace);
  });
});
First, we create variables with a few restaurant names, because we'll use them several times.
Next, we call cy.intercept() to stub a backend request to a URL—in this case, the https://api.outsidein.dev/YOUR-API-KEY/restaurants URL we just tested out. (Note that we don't hard-code your API key here; we use a * to match any value in the API key spot of the path.) When the app attempts to send a GET request to a matching URL, Cypress will intercept that request and return the specified response. We pass the method an array of two restaurant objects. Cypress will convert that array of objects into a JSON string and return that from the stubbed network call.
Why stub our backend request? This allows us to test our frontend application in isolation from the backend. Doing so means that even if the backend is slow, unreachable, or its data has changed, our frontend E2E test will continue to pass, confirming that our frontend app behaves as expected. In particular, isolating our frontend from our backend is important to prevent flaky test failures on CI that would prevent merging our pull requests.
Next, we call cy.visit() to load our application in the browser. In the previous chapter we configured the baseUrl to http://localhost:3000, so we don't need to pass in the full URL, just the path on the server. We pass a path of / to load the root of our app.
Finally, we confirm that the page contains both restaurant names. This will ensure that the app successfully retrieved them from the backend and displayed them on the page.
After we've created our test, the next step in TDD is to run the test and watch it fail. This test will fail (be "red") at first because we haven't yet implemented the functionality.
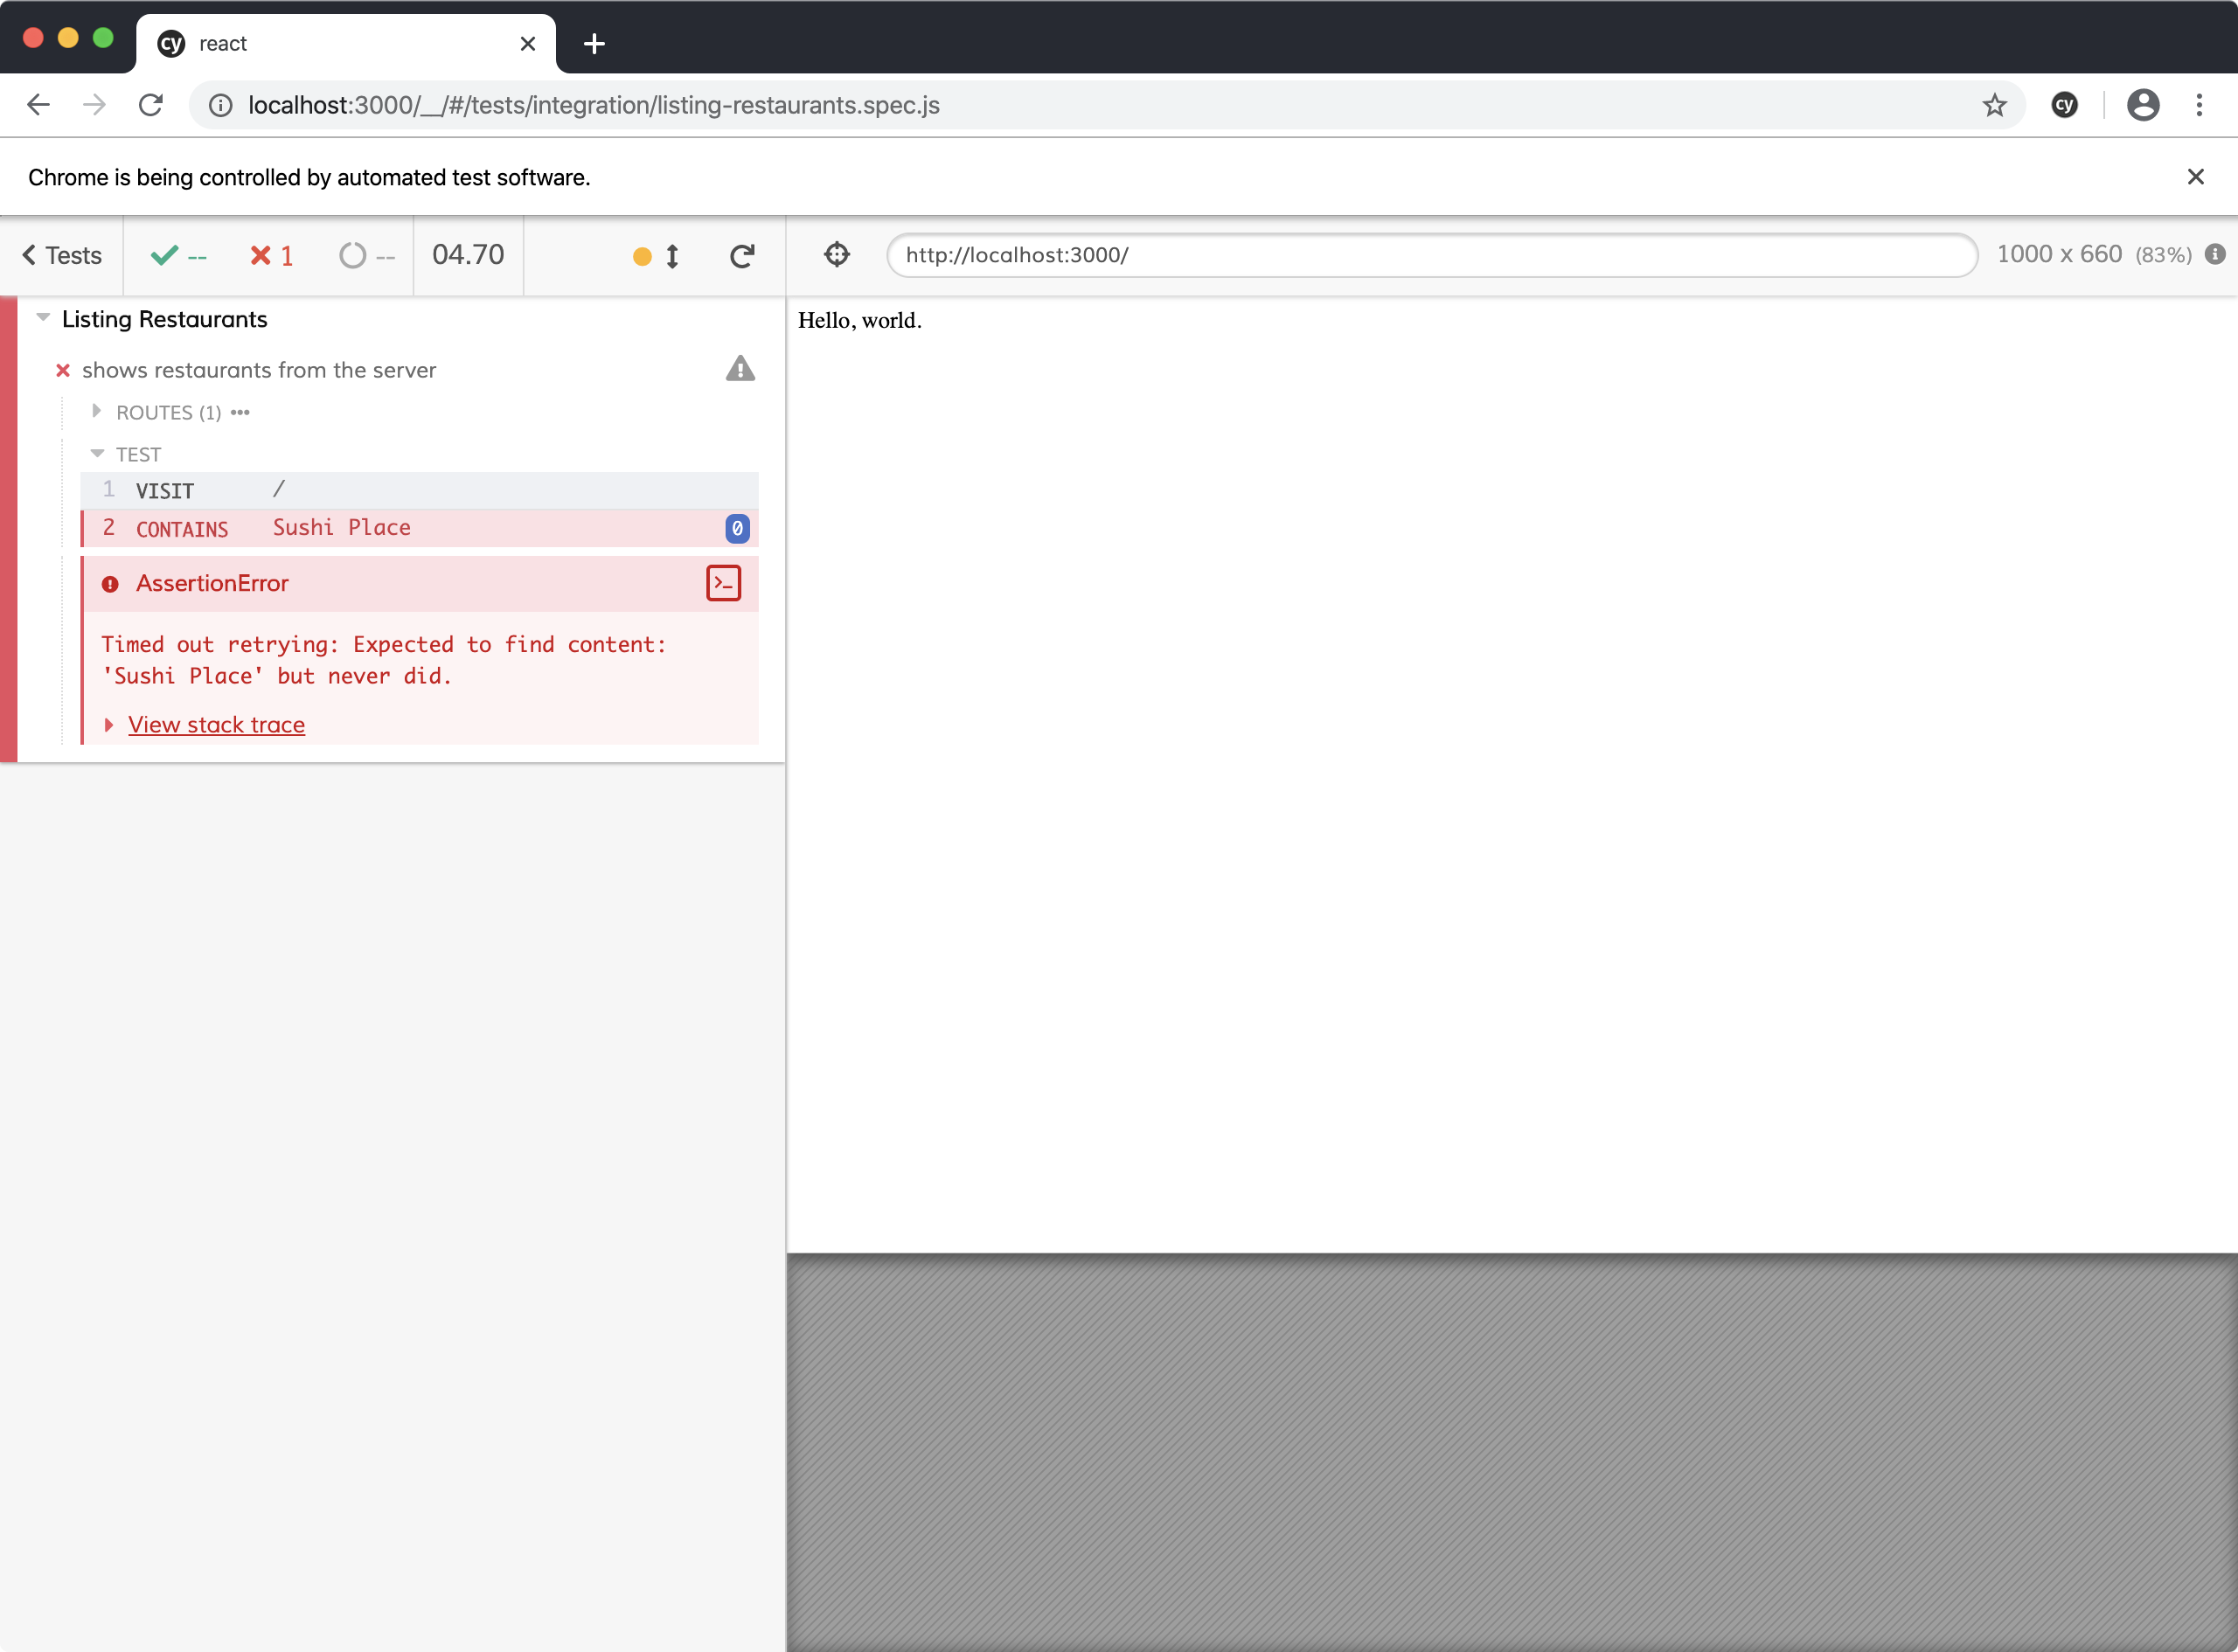
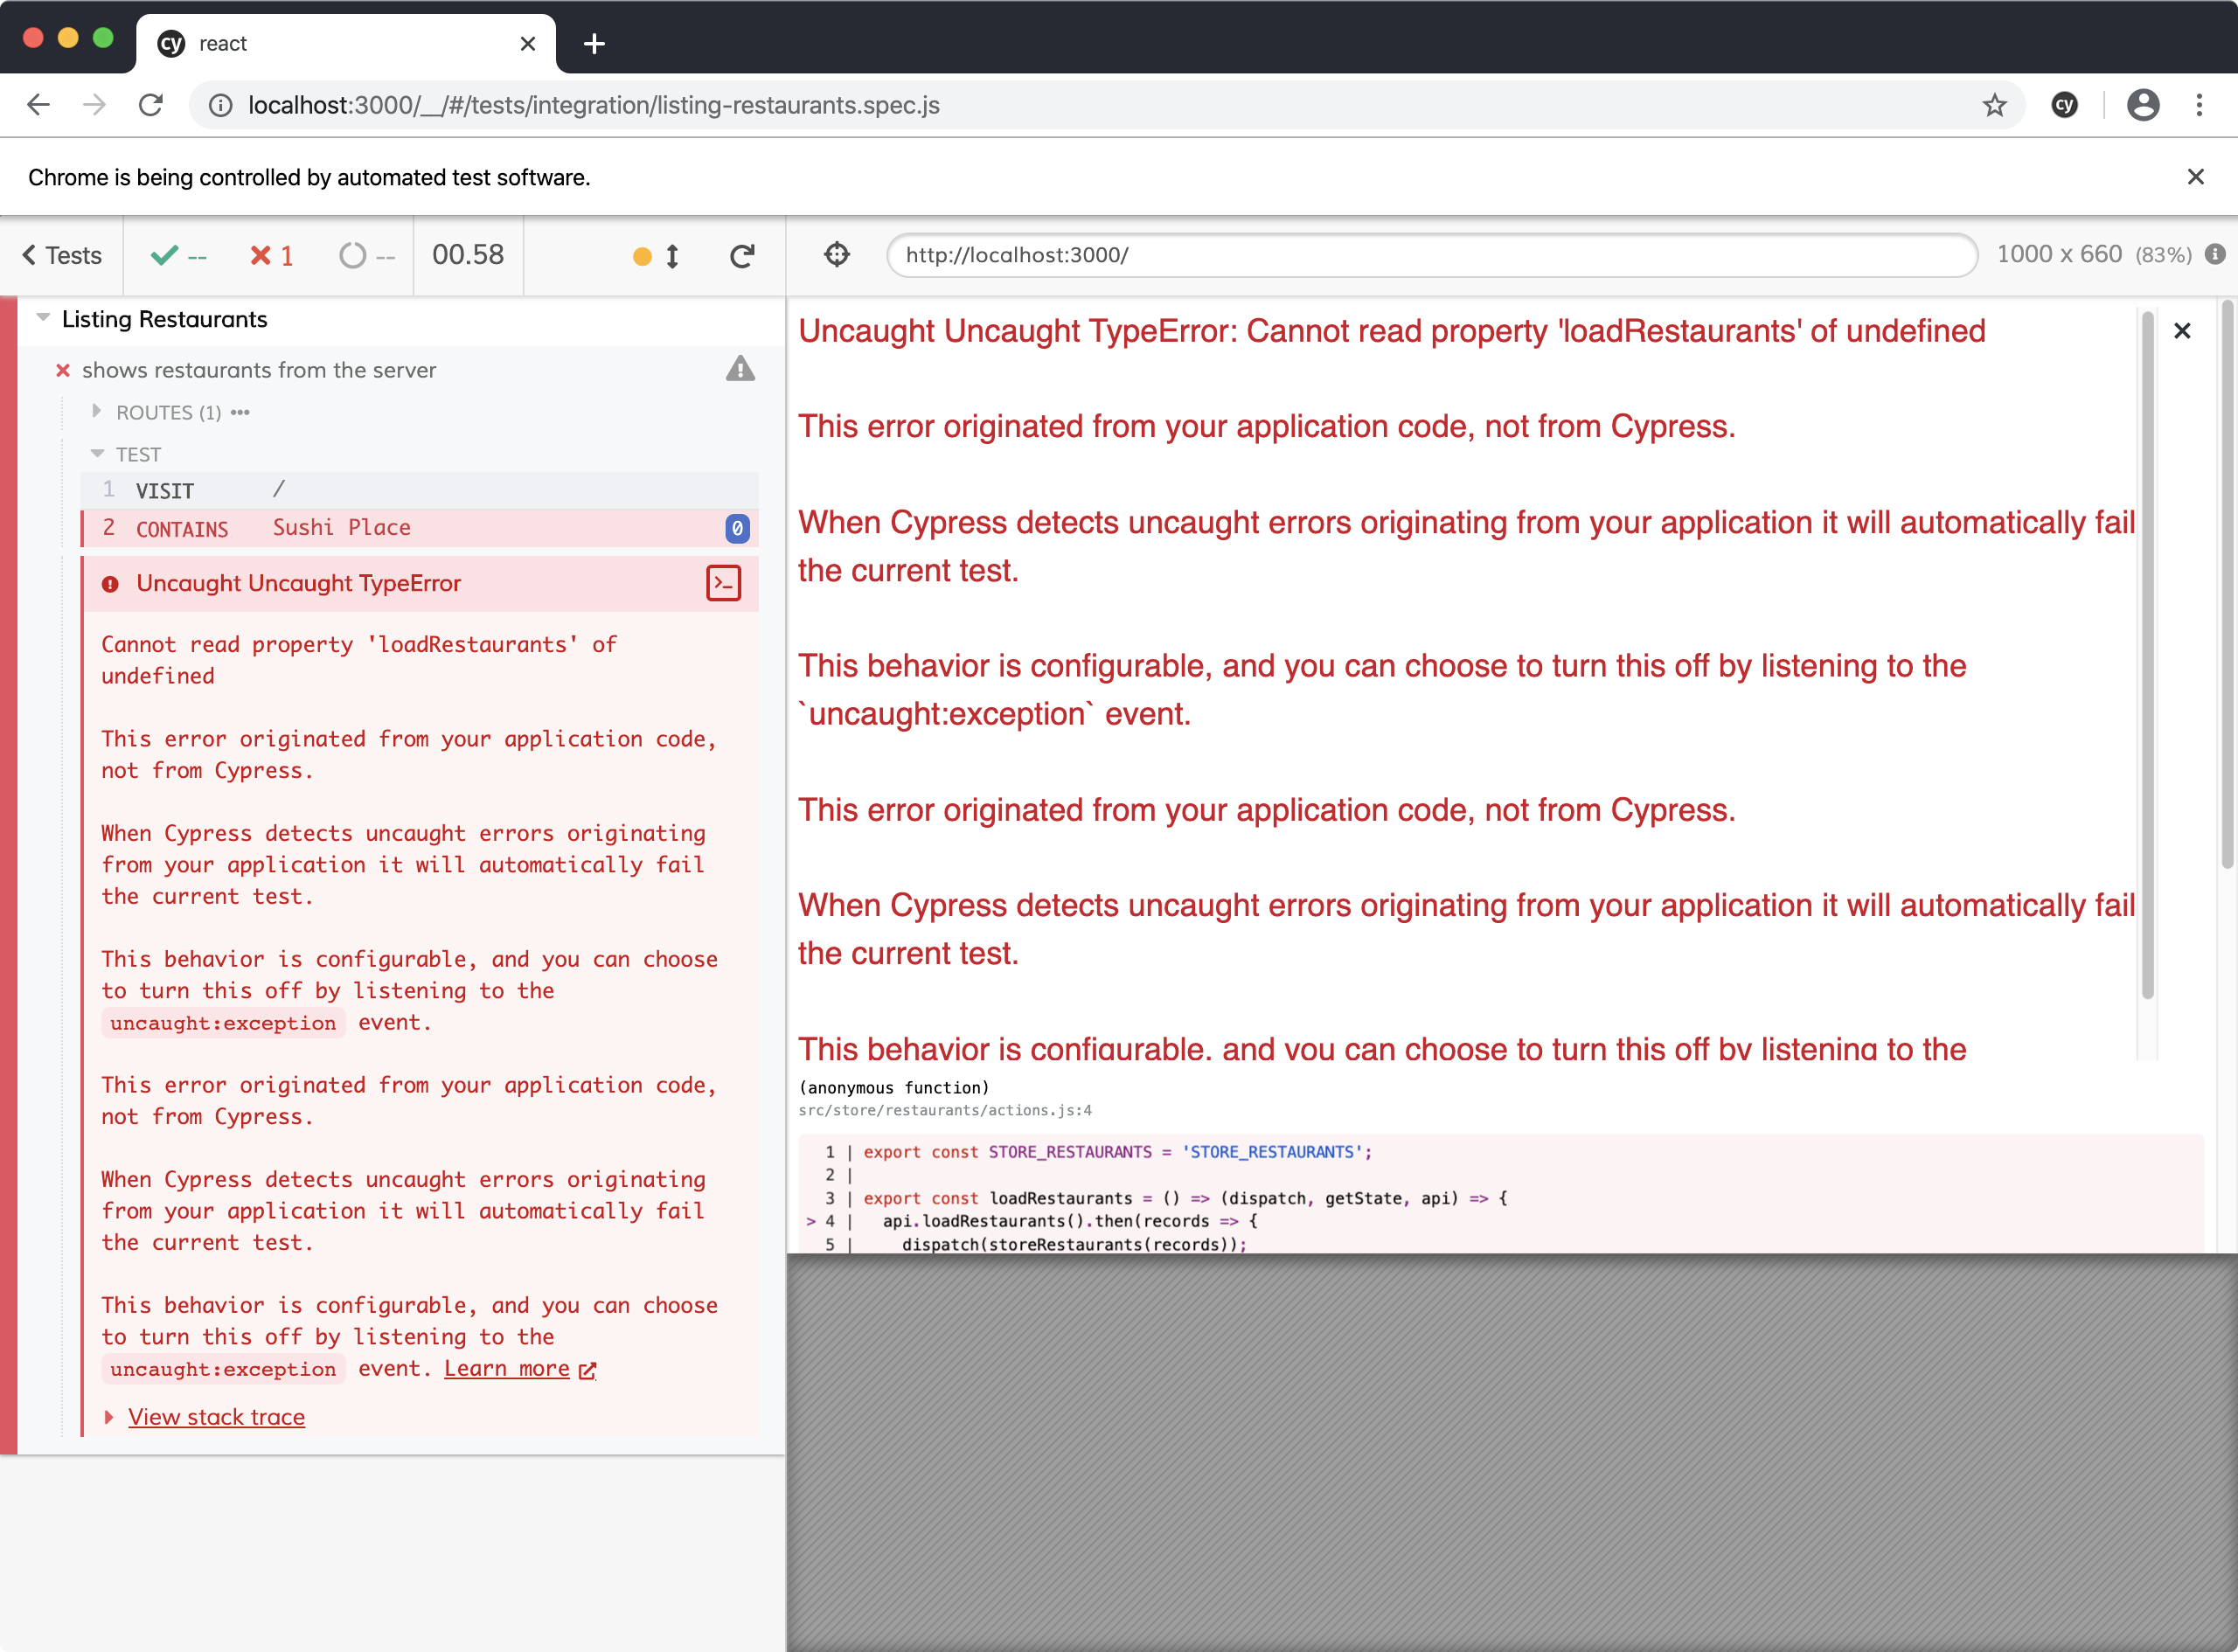
To run our test, run the app with yarn start and leave it running, then, in another terminal, run yarn cypress. After a few seconds Cypress should open. In Cypress, click listing-restaurants.spec.js. Chrome should open, and the test should run. It is able to visit the root of our app, but when it attempts to find "Sushi Place" on the page, it fails.
Let's go ahead and commit this E2E test to git. It won't pass until the end of the branch, but as outside-in TDDers we don't mind having our current E2E test failing: it tells us that we still have more work to do before our current feature is done. Committing it now allows us to have focused commits going forward for each step of unit functionality we add toward completing the feature.
$ git add .
$ git commit -m "Specify app should list restaurants"
Now it's time for us to start writing the code to make the E2E test pass. Let's think about how we want to structure our code. We're going to have three layers:
- Components that display the user interface,
- A Redux store that stores our data and lets us interact with it, and
- An API client that allows us to make requests to the backend.
With outside-in testing, we build the outside first, which in this case is our user interface components. And a common principle is to write the code you wish you had. What does that mean in our case? Well, when we created our app, we were given an <App /> component. Do we want to put our user interface directly in there? No, it's best to save the <App /> component for app-wide concerns such as a title bar that we'll add soon. Instead, it would be great if we had a <RestaurantScreen /> component that would contain everything specific to our restaurants. We wish we had it, so let's add it to App.js:
+import RestaurantScreen from './components/RestaurantScreen';

 export default function App() {
-  return <div>Hello, world.</div>;
+  return (
+    <div>
+      <RestaurantScreen />
+    </div>
+  );
 }
We've referenced the RestaurantsScreen component that we wish we had, so our next step is to actually create it. In src, create a components folder, then inside it create a RestaurantScreen.js file. For the moment let's add just enough implementation to render a static header. Add the following to RestaurantScreen.js:
export default function RestaurantScreen() {
  return (
    <div>
      <h1>Restaurants</h1>
    </div>
  );
}
Rerun the E2E test and you should get the same test failure as before. But on the right you should see the "Restaurants" text displayed, and we're beginning to set up the structure of the code that we'll soon use to get past the test failure.
What do we do next? Well, what do we want to do on the RestaurantScreen? For the current story, we want to display a restaurant list. But we also have an upcoming story where we want to add new restaurants. Those are two different responsibilities, so instead of adding both responsibilities directly to RestaurantScreen, let's plan to eventually have a child component for each. Since our current story is limited to listing restaurants, we'll just create the one child component for the restaurant list.
Let's start by writing the code we wish we had again. In RestaurantScreen.js, add the following:
+import RestaurantList from './RestaurantList';

 export default function RestaurantScreen() {
   return (
     <div>
       <h1>Restaurants</h1>
+      <RestaurantList />
     </div>
   );
 }
Now let's implement this RestaurantList component we wish we had. Create a RestaurantList.js file in src/components and again add some minimal static content:
export default function RestaurantList() {
  return <div>RestaurantList</div>;
}
Now we finally have RestaurantList where we'll put logic UI for this story. Let's commit the changes we have. They're a nice, small unit of work: we've added the structure of components that we'll add the behavior to next.
$ git add .
$ git commit -m "Add RestaurantScreen and RestaurantList"
Stepping Down to a Unit Test
So far our components haven't done much: App just renders RestaurantScreen, and RestaurantScreen just renders RestaurantList. This wasn't any significant application logic: it was just code structure. Because of this, there would have been no real benefit to stepping down to a unit test: unit tests are for driving out logic. This is why we wrote this structural code directly under the guidance of the E2E test.
But now that we have RestaurantList, we finally have a place where our logic can live. The component needs to:
- Request for the restaurants to be loaded
- Display the restaurants once they're returned
Instead of adding this logic directly, let's step down from the "outside" level of end-to-end tests to an "inside" component test. This allows us to more precisely specify the behavior of each piece. This unit test will also be helpful in a future story as we add more edge cases to this component. If instead we tried to end-to-end testing every edge case, the tests would be slower to run and harder to understand.
Let's get started on that unit test. In src/components, create a file named RestaurantList.spec.js. The first bit of functionality we need is to load the restaurants, so that's what we'll test first. We'll start with the structure of the test suite:
describe('RestaurantList', () => {
  it('loads restaurants on first render', () => {
  });
});
In production our component will be connected to our Redux store, with a dispatch function passed as a prop. We don't want to connect it that way in our unit tests, though. Instead, we'll create a mock function that is passed as a prop in place of the Redux dispatch function; then we can run an expectation on that mock function.
Our component needs to ask our store to load the restaurants, so that means we need a loadRestaurants function to pass in:
 it('loads restaurants on first render', () => {
+  const loadRestaurants = jest.fn().mockName('loadRestaurants');
 });
jest.fn() creates a Jest mock function that will allow us to check that it was called. We assign it to the loadRestaurants variable. We also chain a call to .mockName('loadRestaurants') to give the function a name that is visible to Jest; this will make our error messages more readable.
Now, we're ready to render our component:
+import {render} from '@testing-library/react';
+import RestaurantList from './RestaurantList';

 describe('RestaurantList', () => {
   it('loads restaurants on first render', () => {
     const loadRestaurants = jest.fn().mockName('loadRestaurants');
+
+    render(<RestaurantList loadRestaurants={loadRestaurants} />);
   });
 });
We import the RestaurantList component, then we use React Testing Library's render() function to render it. We pass JSX to the render() function just like we'd write in production code, and we pass the loadRestaurants function as a component prop.
Finally, we're ready to run an expectation to confirm that the component loads restaurants on first render. We check that our mock function was called:
 it('loads restaurants on first render', () => {
   const loadRestaurants = jest.fn().mockName('loadRestaurants');

   render(<RestaurantList loadRestaurants={loadRestaurants} />);
+
+  expect(loadRestaurants).toHaveBeenCalled();
 });
Now we're ready to run our unit test and watch it fail. Remember, the TDD loop is red-green-refactor, and the first step is to write a failing test. Once we see it fail in the way we expect, then we'll make it pass.
Run yarn test and leave it running for the remainder of this chapter. Jest will run our unit test, and we'll get the following error:
 FAIL  src/components/RestaurantList.spec.js
  RestaurantList
    ✕ loads restaurants on first render (19ms)

  ● RestaurantList › loads restaurants on first render

    expect(loadRestaurants).toHaveBeenCalled()


    Expected number of calls: >= 1
    Received number of calls:    0

       8 |     render(<RestaurantList loadRestaurants={loadRestaurants} />);
       9 |
    > 10 |     expect(loadRestaurants).toHaveBeenCalled();
         |                             ^
Our test says we expected the loadRestaurants() function to have been called at least once, but it wasn't called. This is the error we would expect to see, because we haven't hooked up the first-render functionality yet.
Now that we have a red test, it's time to move on to the second step of the TDD loop and make it green. To call a function once when our component renders, we'll use the React useEffect hook. Call the loadRestaurants function inside a useEffect:
+import {useEffect} from 'react';

-export default function RestaurantList() {
+export default function RestaurantList({loadRestaurants}) {
+  useEffect(() => {
+    loadRestaurants();
+  }, [loadRestaurants]);
+
   return <div>RestaurantList</div>;
 }
This is the typical useEffect pattern to run an effect only once. The dependency array we pass to useEffect contains loadRestaurants, so the effect will run once each time loadRestaurants changes. In our test (and in our real application) loadRestaurants will never change, so the effect just runs once when the component first renders.
Save the file and Jest will automatically rerun our unit test. Sure enough, our test is green. We've passed our first unit test! Let's commit the unit test and production code that makes it pass in one commit:
$ git add .
$ git commit -m "Load restaurants upon first rendering RestaurantList"
This gives us one of the behaviors we want our RestaurantList to have: loading the restaurants when it is first rendered. Now it's time to write a test for the second behavior: displaying the restaurants. Let's add another it() block inside the describe(), with the following contents:
it('displays the restaurants', () => {
  const noop = () => {};
  const restaurants = [
    {id: 1, name: 'Sushi Place'},
    {id: 2, name: 'Pizza Place'},
  ];

  render(<RestaurantList loadRestaurants={noop} restaurants={restaurants} />);
});
So far this test is pretty similar to our previous one. There are just a few differences:
- Instead of creating a Jest mock function for
loadRestaurants, we create anoopfunction that does nothing ("no operation"). We still need a function our component can call, but because in this test we don't need to run an expectation on it, a noop function is all we need. - We define a
restaurantsvariable that contains an array of two restaurant objects.
Now, instead of running an expectation that loadRestaurants was called, we use the screen.getByText function to check what our component renders:
-import {render} from '@testing-library/react';
+import {render, screen} from '@testing-library/react';
 import {RestaurantList} from './RestaurantList';
...
   render(<RestaurantList loadRestaurants={noop} restaurants={restaurants} />);
+
+  expect(screen.getByText('Sushi Place')).toBeInTheDocument();
+  expect(screen.getByText('Pizza Place')).toBeInTheDocument();
 });
screen.getByText finds an element containing the passed-in text. We pass in the name of each of the two restaurants. If found, getByText returns a reference to the element, and the .toBeInTheDocument() matcher will pass. If not found, we will get a test error that the element could not be found.
Why did we split this unit test out from the first one? We are following the testing principle to check one behavior per test in unit tests. In our first test we checked the loading behavior, and in this test we are checking the restaurant-display behavior. Having separate test cases for each behavior of the component makes it easy to understand what the component does, and if one of the assertions fails it will be easy to see what went wrong. This principle is sometimes phrased "one assertion per test", but in this test we have two assertions. We're following the spirit of the principle, though, because those two assertions are very closely related: they're checking for two analogous bits of text on the page.
While we're discussing this principle, we should note that it only applies to unit tests, not end-to-end tests. When your feature has multiple behaviors that need to be checked, you should check multiple behaviors per test in end-to-end tests. Why? End-to-end tests are slower, so the overhead of the repeating the setup steps would significantly slow down our end-to-end test suite as it grows. Also, in outside-in TDD we think of an end-to-end test as defining a single feature in our app, so the test should run through an entire sequence necessary to define the feature, even if it requires multiple assertions.
Our first feature happens to only have one set of closely-related assertions in the end-to-end test. The second feature we'll build in, in a later chapter, will make assertions on multiple behaviors in one end-to-end test.
When we save the file, our test runs, and it's red, as we expect. We get the following error:
  ● RestaurantList › displays the restaurants

    TestingLibraryElementError: Unable to find an element with the text: Sushi
    Place. This could be because the text is broken up by multiple elements. In
    this case, you can provide a function for your text matcher to make your
    matcher more flexible.
So no element with the text "Sushi Place" is found. We could hard-code an element with that text, but it's better to go ahead and pull it from the props:
-export const RestaurantList = ({loadRestaurants}) => {
+export const RestaurantList = ({loadRestaurants, restaurants}) => {
   useEffect(() => {
     loadRestaurants();
   }, [loadRestaurants]);

-  return <div>RestaurantList</div>;
+  return (
+    <ul>
+      {restaurants.map(restaurant => (
+        <li key={restaurant.id}>{restaurant.name}</li>
+      ))}
+    </ul>
+  );
 };
When we save the file, our test of the output passes, but now our first test fails:
● RestaurantList › loads restaurants on first render

  TypeError: Cannot read property 'map' of undefined

     8 |   return (
     9 |     <ul>
  > 10 |       {restaurants.map(restaurant => (
We're mapping over the restaurants, but in our first test we didn't pass in a restaurants prop. Let's update the test to pass in an empty array, since that test doesn't care if any restaurants are displayed:
 it('loads restaurants on first render', () => {
   const loadRestaurants = jest.fn().mockName('loadRestaurants');
+  const restaurants = [];

-  render(<RestaurantList loadRestaurants={loadRestaurants} />);
+  render(
+    <RestaurantList
+      loadRestaurants={loadRestaurants}
+      restaurants={restaurants}
+    />,
+  );

   expect(loadRestaurants).toHaveBeenCalled();
 });
Save and now both tests are passing. We've now successfully defined both behaviors of our RestaurantList!
Go ahead and commit your changes again. From here on out, we won't remind you to make small commits as we go, but I would encourage you to do so.
In the TDD cycle, whenever the tests go green, look for opportunities to refactor, both in production code and test code. Our production code is pretty simple and no improvements jump out at me. But our test code has some duplication. Now that we see which parts are duplicated between the two tests, let's extract that duplication.
Let's set up some shared data and a helper function to render the component:
 describe('RestaurantList', () => {
+  const restaurants = [
+    {id: 1, name: 'Sushi Place'},
+    {id: 2, name: 'Pizza Place'},
+  ];
+  let loadRestaurants;
+
+  function renderComponent() {
+    loadRestaurants = jest.fn().mockName('loadRestaurants');
+
+    render(
+      <RestaurantList
+        loadRestaurants={loadRestaurants}
+        restaurants={restaurants}
+      />,
+    );
+  }
+
   it('loads restaurants on first render', () => {
You may be wondering about why we are setting up restaurants and loadRestaurants in different ways. We assign restaurants once to a const, but we declare loadRestaurants as a let and assign a new mock function to it each time renderComponent() is called. The reason for this difference is to make sure we have a fresh starting point for each of our tests. Jest mock functions have internal state that is mutated to track when they are called. If you reuse the same mock function for multiple tests, the mock will report that it was called in a previous test, and you can end up with false positives or negatives. There are ways to reset the state of a mock function, but as a general rule it's safest to recreate any mutable state at the start of each test. Since restaurants is not mutated, though, it's safe to create it statically.
You may also wonder why we're creating a mock function and array with data when both are not used in both of our tests. Only one test needs loadRestaurants to be a mock, and only the other test needs restaurants to have elements. That's true, but our test code would be more complex if we left it as-is with separate setup for each. As written, our renderComponent() sets up our component in a good default state, so each test be written to focus only on what it wants to assert.
Now we can replace the duplicated code from the individual tests with a call the renderComponent() function:
 it('loads restaurants on first render', () => {
-  const loadRestaurants = jest.fn().mockName('loadRestaurants');
-  const restaurants = [];
-
-  render(
-    <RestaurantList
-      loadRestaurants={loadRestaurants}
-      restaurants={restaurants}
-    />,
-  );
-
+  renderComponent();
   expect(loadRestaurants).toHaveBeenCalled();
 });

 it('displays the restaurants', () => {
-  const noop = () => {};
-  const restaurants = [
-    {id: 1, name: 'Sushi Place'},
-    {id: 2, name: 'Pizza Place'},
-  ];
-
-  render(<RestaurantList loadRestaurants={noop} restaurants={restaurants} />);
-
+  renderComponent();
   expect(screen.getByText('Sushi Place')).toBeInTheDocument();
   expect(screen.getByText('Pizza Place')).toBeInTheDocument();
 });
Save the file and our tests should still pass. With this, our test blocks are much shorter: all they contain is the expectations. This is good because it keeps our tests focused and very easy to read.
Stepping Back Up
We've now specified the behavior of our RestaurantList component, so our unit test is complete. The next step in outside-in TDD is to step back up to the end-to-end test and see our next failure. Rerun the test in Chrome and we see:
TypeError: Cannot read properties of undefined
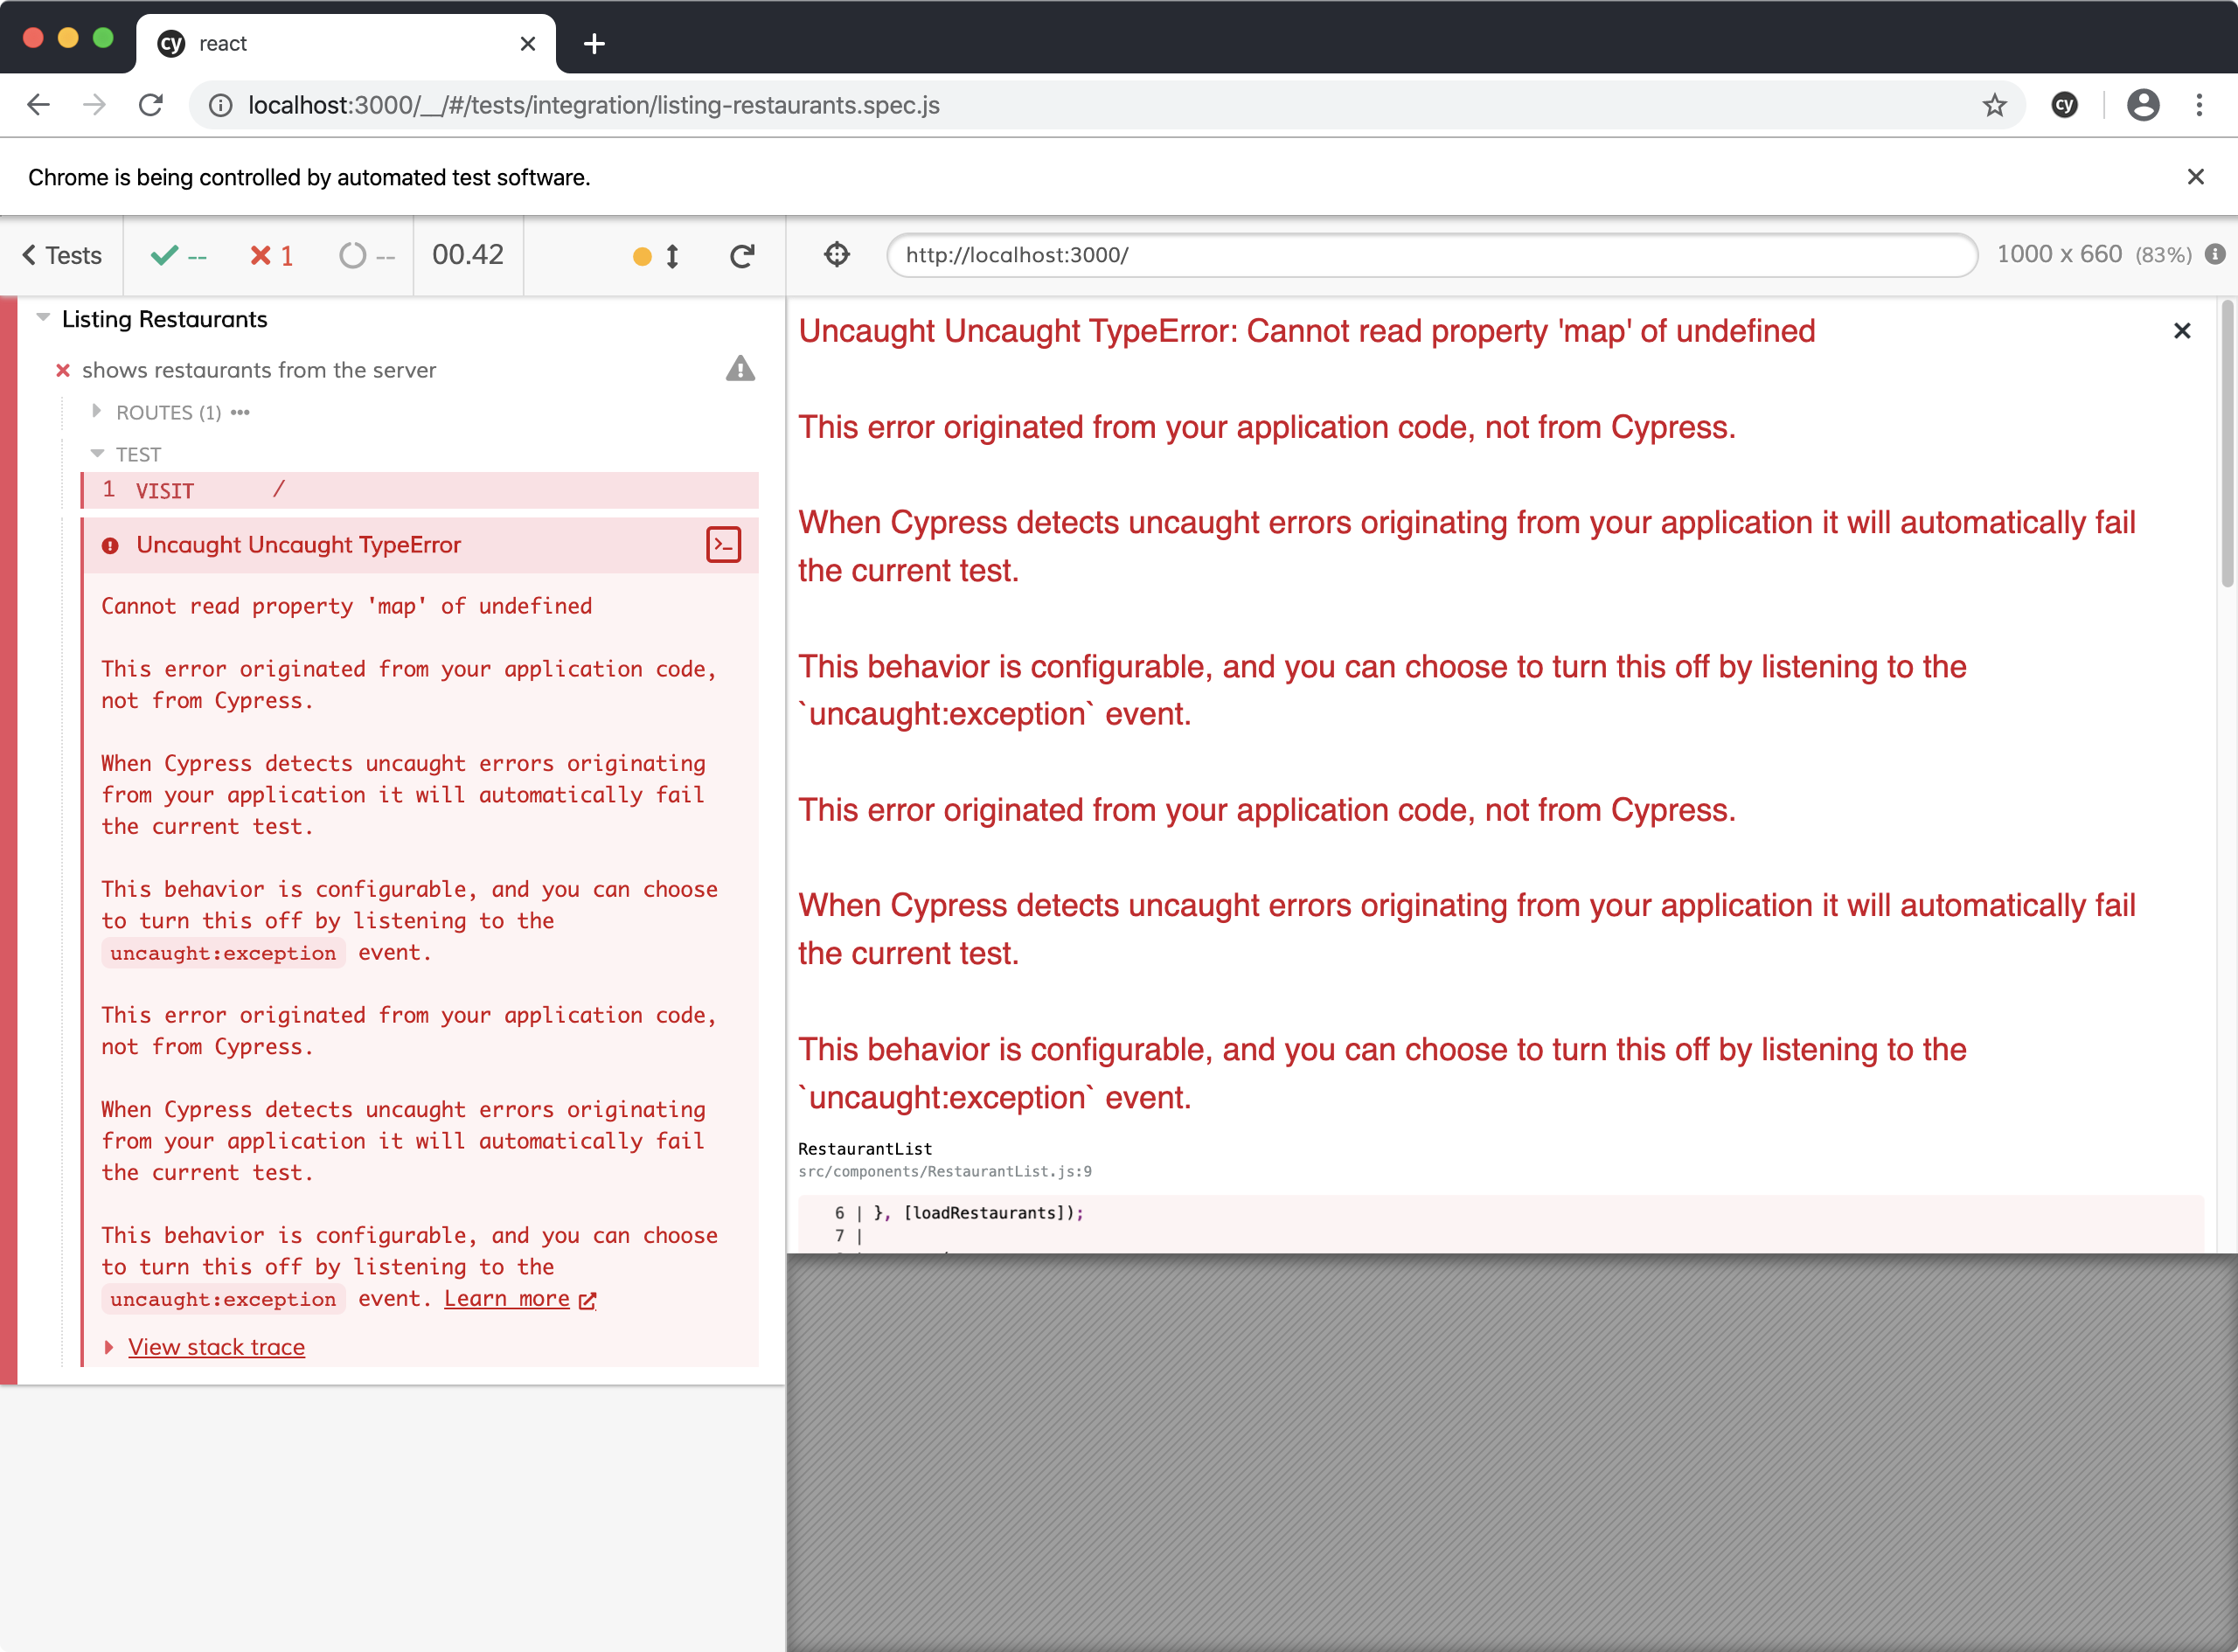
This should make sense from what we just built: we called the map function on the restaurants array, but in our application code we aren't yet passing a restaurants array. How do we want our component to get that array? We want it to be provided by the Redux store. It's time to write the code we wish we had, and hook our restaurant list up to Redux.
Add redux and react-redux dependencies:
$ yarn add redux@4.2.0 \
           react-redux@8.0.1
Next, connect the RestaurantList component to the appropriate state. This is what will ultimately fix our Cypress error:
 import {useEffect} from 'react';
+import {connect} from 'react-redux';

-export default function RestaurantList({loadRestaurants, restaurants}) {
+function RestaurantList({loadRestaurants, restaurants}) {
  useEffect(() => {
...
 }

+const mapStateToProps = state => ({
+  restaurants: state.restaurants.records,
+});
+
+export default connect(mapStateToProps)(RestaurantList);
Note that we are using the React-Redux connect() function rather than the newer hooks-based API. Redux maintainer Mark Erikson writes about the tradeoffs between the two React-Redux APIs, and there is not a strong recommendation to use one or the other. Because our component testing approach involves passing props to a component that is unaware of Redux, the connect() function is a more natural fit. We could accomplish the same by creating a "connected" component that uses React-Redux hooks and passes the props down to the unconnected component, but there are few benefits to that approach over using connect().
Save RestaurantList.js. If you haven't left your Jest tests running, run yarn test. Notice that we are now getting a failure:
● RestaurantList › loads restaurants on first render

  Could not find "store" in the context of "Connect(RestaurantList)". Either
  wrap the root component in a <Provider>, or pass a custom React context
  provider to <Provider> and the corresponding React context consumer to
  Connect(RestaurantList) in connect options.
How do we want to provide the Redux store in our component test? Well, we don't: that integration will be tested as part of our E2E test, not our component test. For the latter, we want to test the component in isolation, to answer the question "assuming Redux passes in the correct data to the component, does it behave correctly?"
To arrange our component test to answer this question, we can follow a technique where we export two components:
- We export the Redux-connected component as the default export, and
- We export the unconnected component as a named export.
We'll use the connected component in our production code, and we'll use the unconnected component for testing.
To make this change, add the export keyword in front of our component function:
-function RestaurantList({loadRestaurants, restaurants}) {
+export function RestaurantList({loadRestaurants, restaurants}) {
   useEffect(() => {
Next, update the test to use the named import:
 import {render, screen} from '@testing-library/react';
-import RestaurantList from './RestaurantList';
+import {RestaurantList} from './RestaurantList';

 describe('RestaurantList', () => {
The tests should automatically rerun and pass again.
If you've used Redux before you know we have more setup steps to do. But let's rerun the E2E test to let it drive us to do so. The error we get is:
Error: Could not find "store" in the context of
"Connect(RestaurantList)".
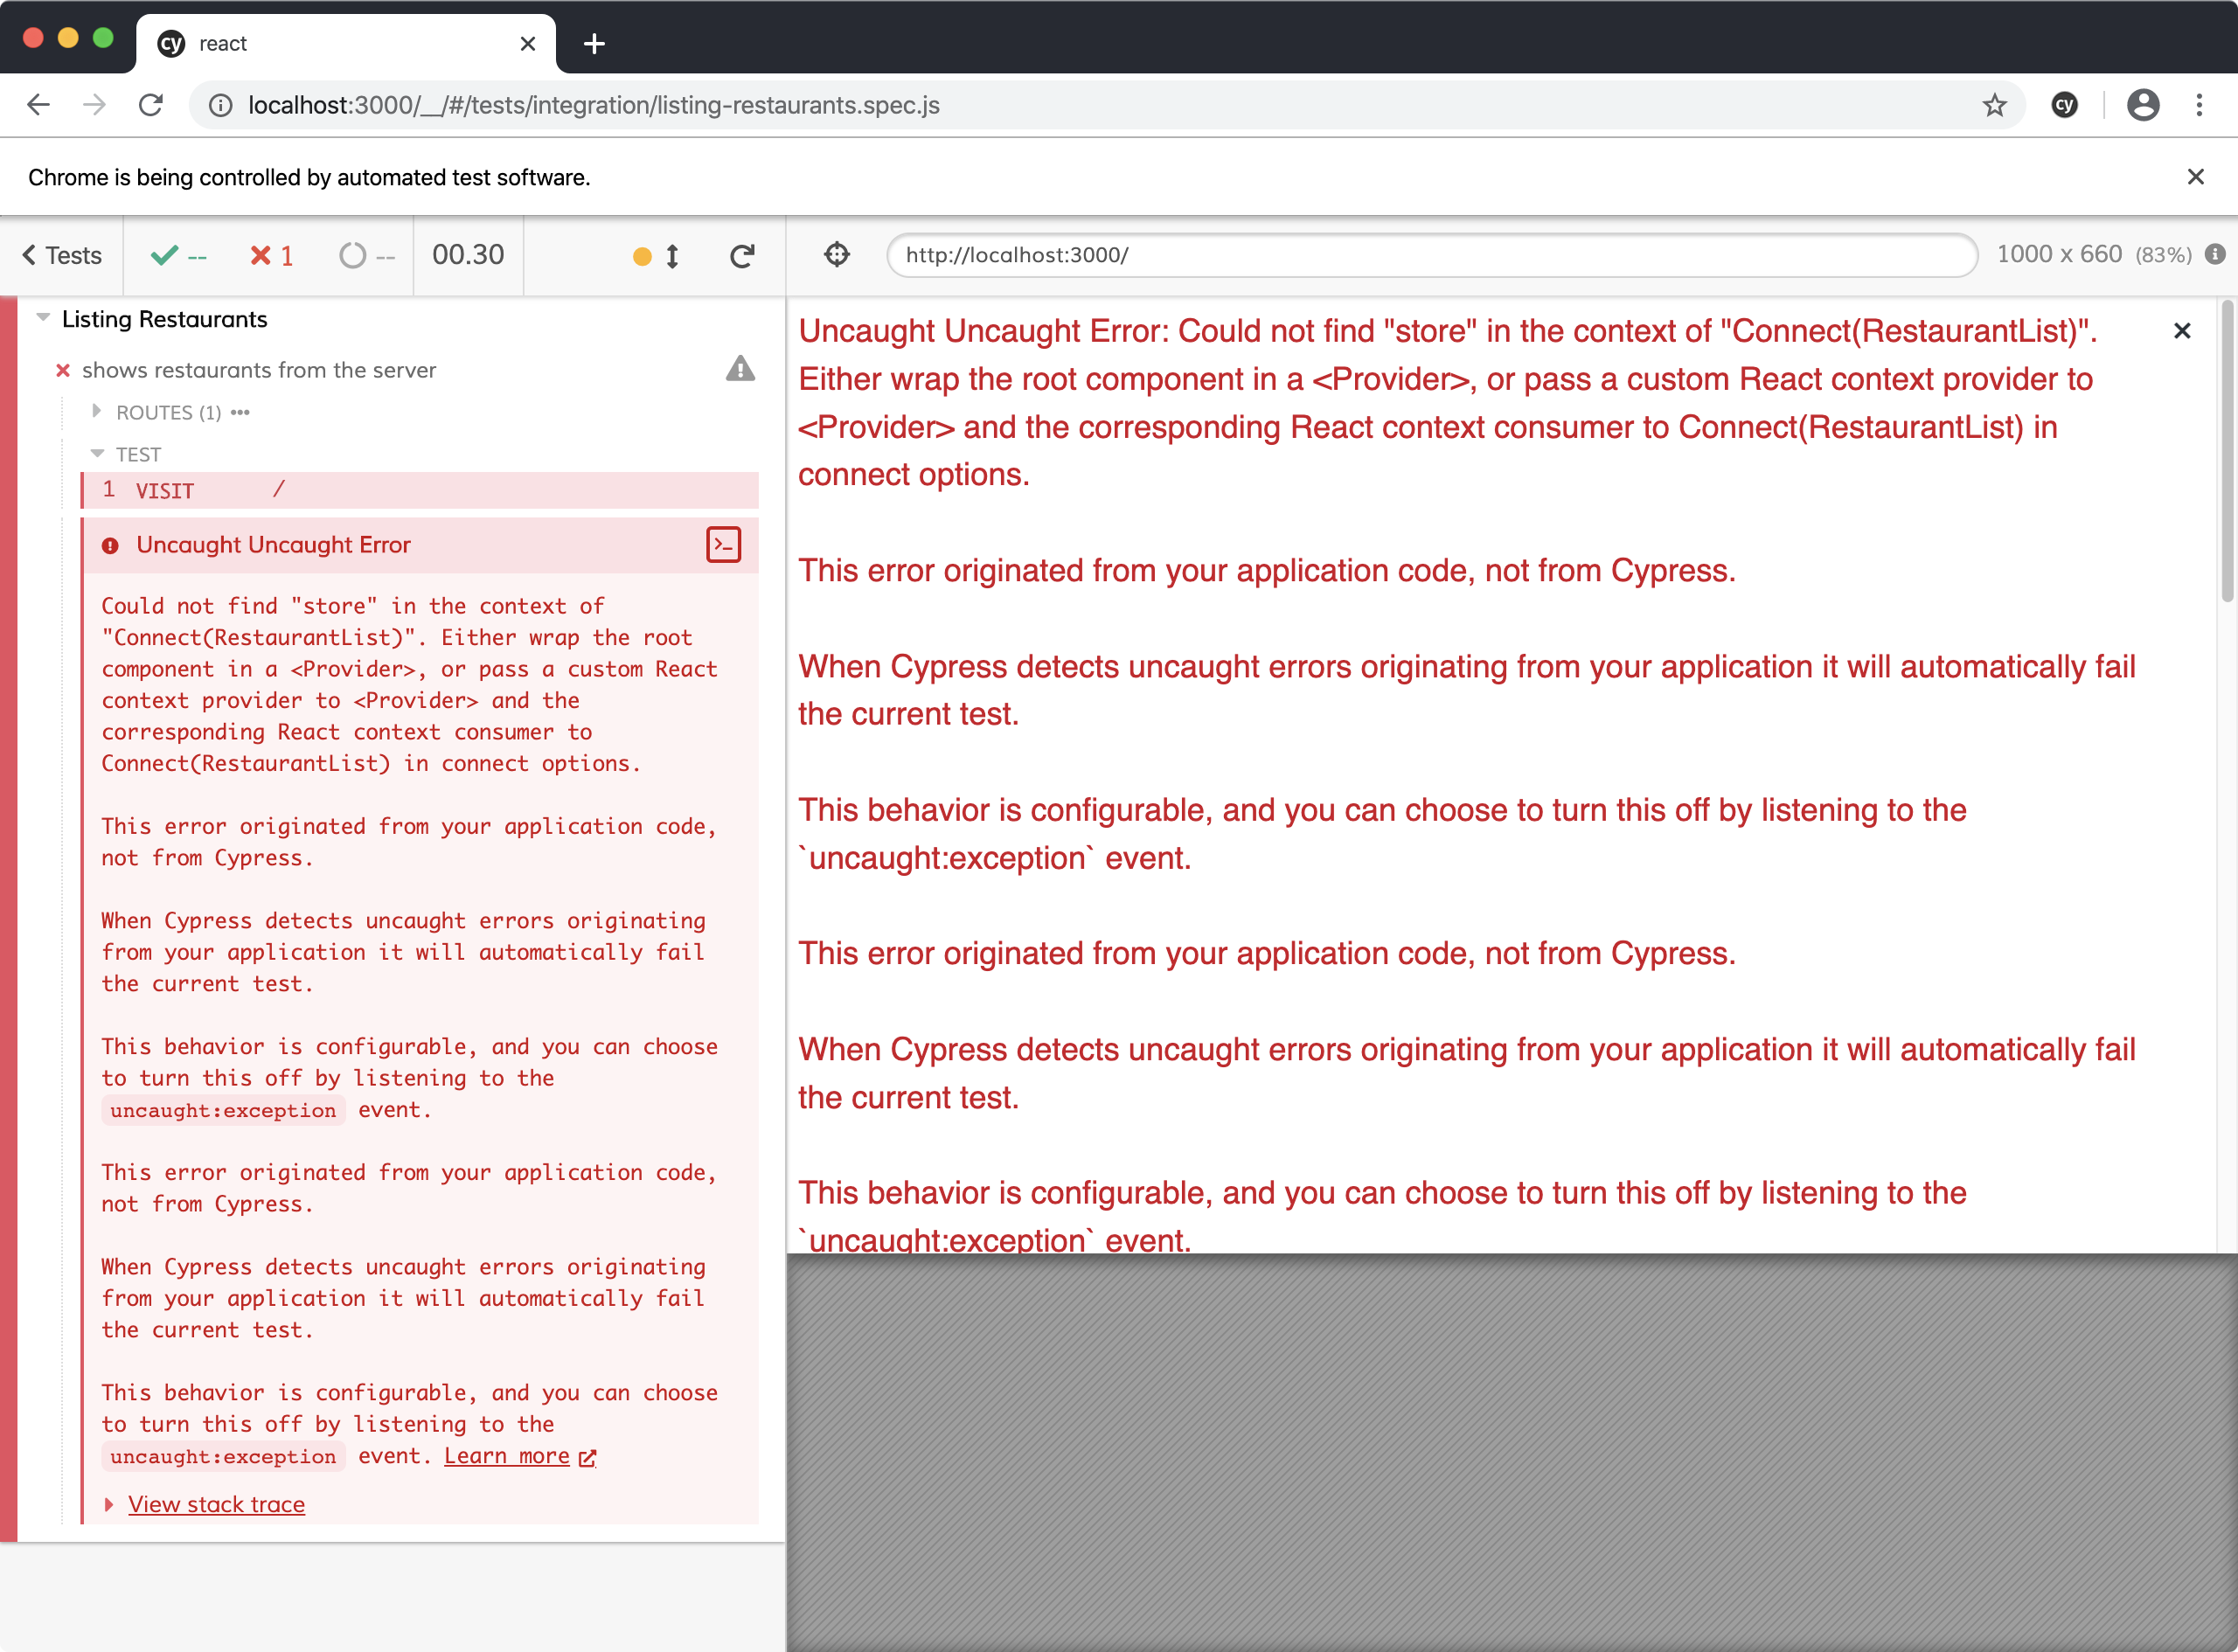
This is the same error we saw in our Jest tests when our component wasn't hooked up to a Redux store. But because this is our real application code now, we do want to hook it up to a Redux store. Let's do that now, in App.js.
We wish we had a Redux store, so we write the wish we had, importing a ./store module. We pass it to the Redux Provider component:
+import {Provider} from 'react-redux';
+import store from './store';
 import RestaurantScreen from './components/RestaurantScreen';

 export default function App() {
   return (
-    <div>
+    <Provider store={store}>
       <RestaurantScreen />
-    </div>
+    </Provider>
   );
 )
Now let's define that store. Under src/, create a store folder, then an index.js inside it. Add the following contents:
import {createStore} from 'redux';
import rootReducer from './reducers';

const store = createStore(rootReducer);

export default store;
Now we'll need a root reducer. Create a src/store/reducers.js file. Add the following contents:
import {combineReducers} from 'redux';
import restaurants from './restaurants/reducers';

export default combineReducers({restaurants});
Using combineReducers is typical in Redux, but right now it's a bit unnecessary because we're combining a single reducer into a larger one. The reason we do this is that we're still following the principle of "writing the code we wish we had:" we wish our reducer tree was organized into child reducers, so that it would be easy to add additional reducers in the future. So we go ahead and write our code that way.
Now we need to create the restaurant reducer. Create a src/store/restaurants folder, then a reducers.js file inside it. Add the following contents:
import {combineReducers} from 'redux';

function records() {
  return [];
}

export default combineReducers({
  records,
});
Once again we go ahead and use combineReducers since we will ultimately have multiple restaurant reducers, for values like loading and error flags. For now, to get past the current E2E test error, we just need the one records reducer returning a hard-coded empty array.
This should fix our E2E test error, so rerun the Cypress test. Now we get a new error:
TypeError: loadRestaurants is not a function
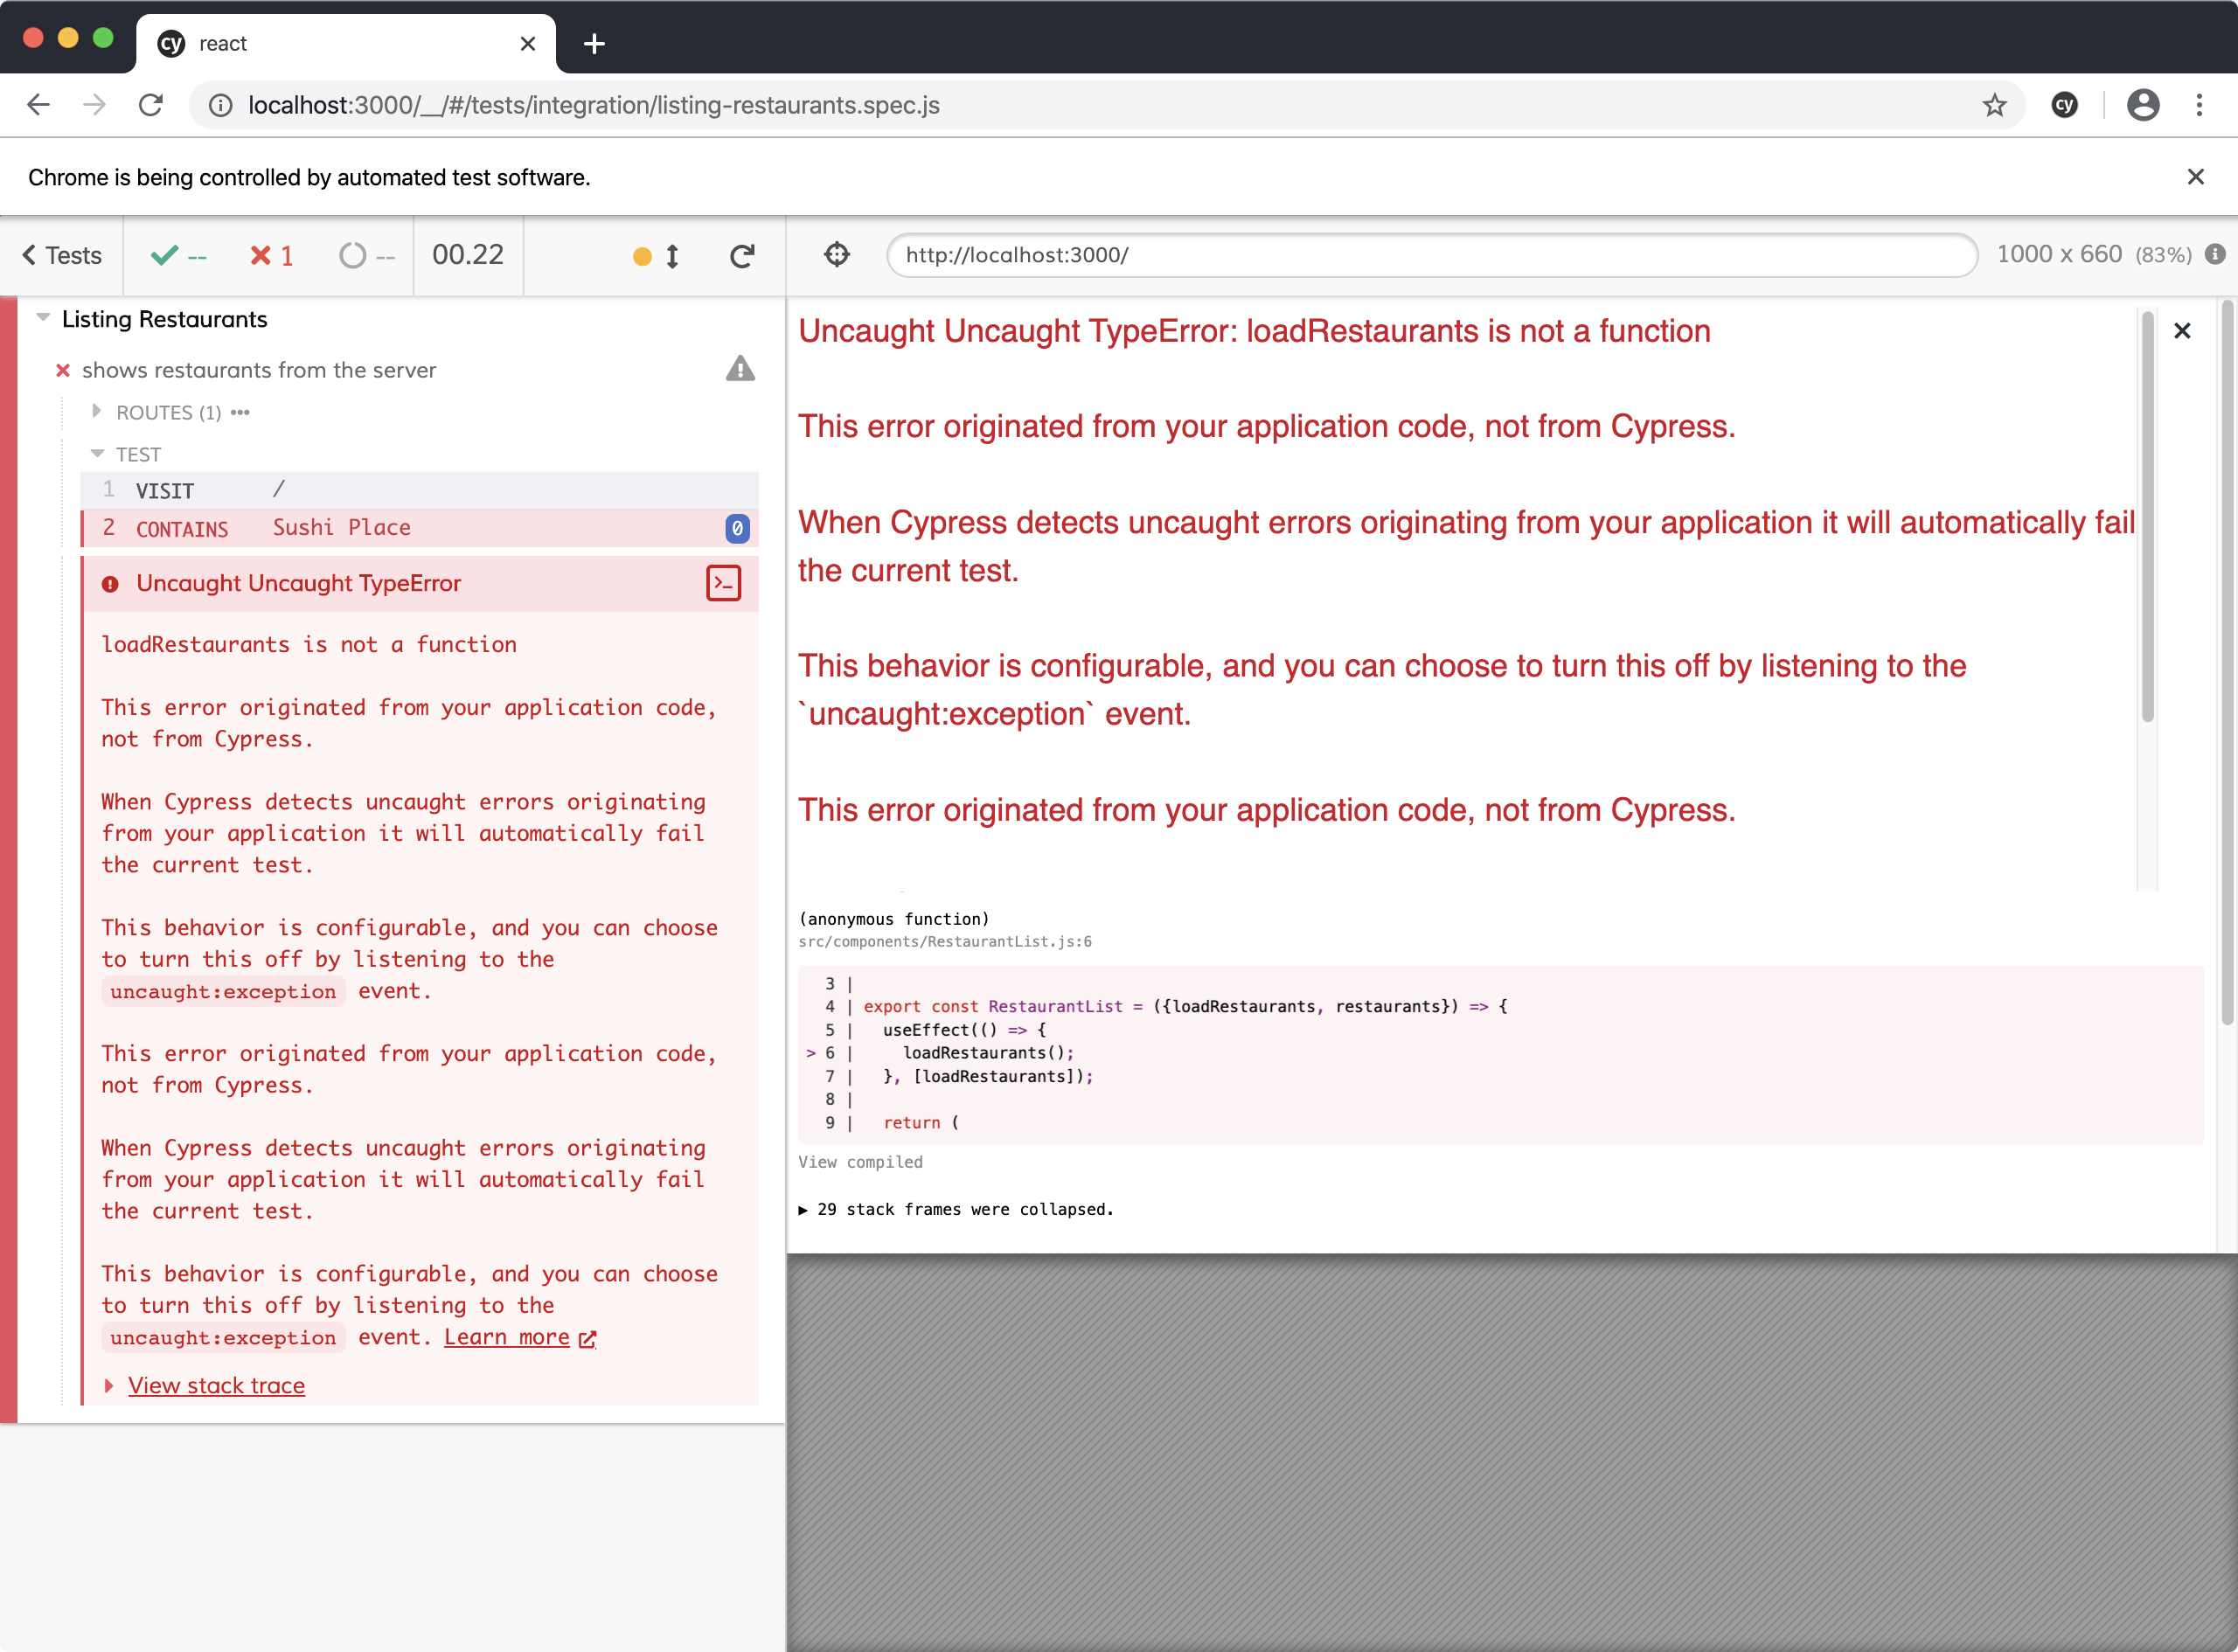
How do we want this missing loadRestaurants function to work? We want it to be an asynchronous Redux action. To make that work, it's time to add redux-thunk:
$ yarn add redux-thunk@2.4.1
Hook it up in src/store/index.js:
-import {createStore} from 'redux';
+import {createStore, applyMiddleware} from 'redux';
+import thunk from 'redux-thunk';
 import rootReducer from './reducers';

-const store = createStore(rootReducer);
+const store = createStore(rootReducer, applyMiddleware(thunk));

 export default store;
In RestaurantList.js, write the code we wish we had to import a loadRestaurants action and provide it to the component:
 import {connect} from 'react-redux';
+import {loadRestaurants} from '../store/restaurants/actions';

 function RestaurantList({loadRestaurants, restaurants}) {
...
 const mapStateToProps = state => ({
   restaurants: state.restaurants.records,
 });

+const mapDispatchToProps = {loadRestaurants};
+
-export default connect(mapStateToProps)(RestaurantList);
+export default connect(mapStateToProps, mapDispatchToProps)(RestaurantList);
Next, we need to implement the actions module we just used. In src/store/restaurants, create actions.js. We're still focused on writing the minimal code to fix the current E2E test error, so let's just export a loadRestaurants thunk that does nothing:
export const loadRestaurants = () => () => {};
Rerun the E2E test. We are no longer getting any errors in the application code; instead, we are back to the failure that the text "Sushi Place" is never shown. But we've made progress in the structure of our code. Now our component is dispatching the loadRestaurants async action and is reading the restaurants from the store. The only thing remaining is that our async action isn't loading those records from the API yet. That's logic we need to implement, meaning it's time to step back down to a unit test—this time for our Redux store.
Unit Testing the Store
To test our store, we're going to create a real Redux store, configure it with our reducer, then dispatch our actions against it. After we finish test-driving our store code, we'll look at the advantages this approach gives us.
Under src/store/, create a restaurants.spec.js file. Add the following structure:
describe('restaurants', () => {
  describe('loadRestaurants action', () => {
    it('stores the restaurants', async () => {
    });
  });
});
We create a describe block for our loadRestaurants action, which right now just has one test: that it stores the restaurants. Note that the test function is async, because the network request will be asynchronous. Now let's fill that test out.
We will need some records to be returned by our stubbed API:
 it('stores the restaurants', async () => {
+  const records = [
+    {id: 1, name: 'Sushi Place'},
+    {id: 2, name: 'Pizza Place'},
+  ];
 });
As we said earlier, our app will consist of three layers:
- The UI components
- The Redux store
- The API client
So we won't make an HTTP request directly in our Redux store. Instead, we'll delegate to an API client object that we pass in. Let's design the interface of that object now:
 it('stores the restaurants', async () => {
   const records = [
     {id: 1, name: 'Sushi Place'},
     {id: 2, name: 'Pizza Place'},
   ];

+  const api = {
+    loadRestaurants: () => Promise.resolve(records),
+  };
 });
Giving the api object a descriptive loadRestaurants() method seems good. We are stubbing out the API here in the test, so we just implement that method to return a promise that resolves to our hard-coded records.
Now, to set up our Redux store. We'll use a real Redux store to run our tests through. That way we are testing our thunks, action creators, and reducers in integration.
Start with the initial state of the reducer:
   const api = {
     loadRestaurants: () => Promise.resolve(records),
   };
+
+  const initialState = {
+    records: [],
+  };
 });
Now we'll create the store itself. Unlike in the full application, we will only pass in the restaurant reducer. The full application may have other reducers, but our test will be focused only on the restaurant reducer.
+import {createStore, applyMiddleware} from 'redux';
+import thunk from 'redux-thunk';
+import restaurantsReducer from './restaurants/reducers';
+
 describe('restaurants', () => {
...
       const initialState = {
         records: [],
       };
+
+      const store = createStore(
+        restaurantsReducer,
+        initialState,
+        applyMiddleware(thunk.withExtraArgument(api)),
+      );
     });
There's something slightly different between how we're setting up thunk here in our test and how we did so in the application code: now we're chaining a call to .withExtraArgument(). This method allows you to pass an additional argument at setup time that will be available to all thunk functions. Our unit test has driven us to use it because now we have an api we need to make available to our thunk.
.withExtraArgument() isn't the only way we can make a mock api available to our thunks. If we were following a more typical JavaScript approach and directly importing the api in our thunks, we could use Jest module mocking to replace that real import with a mocked import.
.withExtraArgument() is a thunk implementation of an approach called "dependency injection," where instead of hard-coding production dependencies, you pass them in to your code as arguments. Dependency injection makes it easier to use test doubles for your dependencies in unit tests.
In general, dependency injection is safer than overriding a hard-coded dependency using something like Jest module mocking because you won't accidentally use the production dependency in tests. If you forget to inject the dependency in your tests, you'll just get an error that the dependency is null. I recommend taking advantage of dependency injection whenever you're using a library that provides a way to inject dependencies and whenever you can write your own code to allow injecting dependencies.
Now that our store is set up, we can dispatch the loadRestaurants action, then check the state of the store afterward:
 import restaurantsReducer from './restaurants/reducers';
+import {loadRestaurants} from './restaurants/actions';

 describe('restaurants', () => {
...
         applyMiddleware(thunk.withExtraArgument(api)),
       );
+
+      await store.dispatch(loadRestaurants());
+
+      expect(store.getState().records).toEqual(records);
     });
The test fails, showing an empty array as the received value:
● restaurants › loadRestaurants action › stores the restaurants

  expect(received).toEqual(expected) // deep equality

  - Expected  - 10
  + Received  + 1

  - Array [
  -   Object {
  -     "id": 1,
  -     "name": "Sushi Place",
  -   },
  -   Object {
  -     "id": 2,
  -     "name": "Pizza Place",
  -   },
  - ]
  + Array []
Now we're ready to implement our loadRestaurants thunk to retrieve the records from the api and dispatch an action to store them.
First, update the loadRestaurants function in actions.js:
-export const loadRestaurants = () => () => {};
+export const STORE_RESTAURANTS = 'STORE_RESTAURANTS';
+
+export const loadRestaurants = () => async (dispatch, getState, api) => {
+  const records = await api.loadRestaurants();
+  dispatch(storeRestaurants(records));
+};
+
+const storeRestaurants = records => ({
+  type: STORE_RESTAURANTS,
+  records,
+});
We define a new STORE_RESTAURANTS action type. Then, in the function loadRestaurants() returns, we call .loadRestaurants() on the passed-in api that we configured when we set up the store. When the call resolves with the returned records, we dispatch a new storeRestaurants() action, passing it the records. We define a storeRestaurants action creator to create the correct action object.
Save the file and the test failure is the same, because the records reducer doesn't yet store the restaurants in response to the STORE_RESTAURANTS action. Update it to do so:
 import {combineReducers} from 'redux';
+import {STORE_RESTAURANTS} from './actions';

-function records() {
-  return [];
+function records(state = [], action) {
+  switch (action.type) {
+    case STORE_RESTAURANTS:
+      return action.records;
+    default:
+      return state;
+  }
 }

 export default combineReducers({
   records,
 });
With this, our test passes.
Now that our test is passing and our store code for this feature is complete, let's talk about the benefits that come from testing the store in integration. Our test interacts with the store the way the rest of our application does: by dispatching async actions and then receiving updated state. Just like the rest of our application, our test doesn't know or care about the STORE_RESTAURANTS action type; it treats it as an implementation detail. This gives us greater flexibility to refactor our store; for example, we could change the way the actions that loadRestaurants dispatches are set up. Our tests would continue to pass as long as the action type and state stayed the same—which is the contract that the rest of our application relies on as well.
Another benefit of testing the store from the outside is that it ensures that all the pieces work together. If we were testing the loadRestaurants async action, the storeRestaurants action creator, and the reducer separately from one another, they might work individually but not together. For example, maybe the names of properties in the action object returned by storeRestaurants aren't the same names as the properties the reducer looks for. Our test exercises the async action, action creator, and reducer in integration, ensuring that if they aren't working together, a unit test will fail. If we weren't testing this way, only an E2E test would catch this problem—and then only if the problem is in one of the main flows that our E2E test covers, not our edge cases.
Creating the API Client
Now that our unit test is passing, it's time to step back up to the E2E test. It fails with a new error:
Cannot read properties of undefined (reading 'loadRestaurants')
If we look closely at the error output, this isn't referring the loadRestaurants action, but to the loadRestaurants method of the api. Our component and store are built; now we just need to build our API client.
You may be surprised to hear that we aren't going to unit test our API client at all; instead, we're going to let the E2E test drive the implementation. Let's go through the process first, then we'll discuss why we didn't unit test it.
To fix the current E2E test failure, we need to create an API object and provide it to redux-thunk. We'll go ahead and create a loadRestaurants() method on the object, too, since we can see from the error that we'll need it.
Create an api.js file under src, and add the following code:
const api = {
  loadRestaurants() {},
};

export default api;
Next, let's wire the API object up our store. Update src/store/index.js:
 import rootReducer from './reducers';
+import api from '../api';

-const store = createStore(rootReducer, applyMiddleware(thunk));
+const store = createStore(
+  rootReducer,
+  applyMiddleware(thunk.withExtraArgument(api)),
+);
Rerun the E2E test and we get a new error:
When called with an action of type "STORE_RESTAURANTS", the slice reducer for key "records" returned undefined.
What's going on here? The return value of records() for action STORE_RESTAURANTS is undefined. We're returning the action.records field, so this means action.records is undefined. This is because we still aren't making the HTTP request that we need to retrieve this data from the backend. Let's fix that now.
We'll use the popular Axios library to make our HTTP requests. Add it to your project:
$ yarn add axios@0.27.2
Instead of Axios, we could have used the browser's built-in fetch() function. But there are still users on older iPhones and IE 11 whose browsers don't have fetch(), and in my opinion Axios provides some nice usability improvements over fetch().
Next, use Axios to make an HTTP request to the correct endpoint:
+import axios from 'axios';
+
+const client = axios.create({
+  baseURL: 'https://api.outsidein.dev/YOUR-API-KEY',
+});
+
 const api = {
-  loadRestaurants() {}
+  async loadRestaurants() {
+    const response = await client.get('/restaurants');
+    return response.data;
   },
 };

 export default api;
In baseURL, replace YOUR-API-KEY with the API key you created earlier. (Note that in a real application you wouldn't hard-code authentication like this, but this is just to keep our exercise simple.)
We import Axios, then call its create() method to create a new Axios instance configured with a base URL pointing to the backend, including your personal API key. Then we implement our loadRestaurants() method by calling the Axios client's get() method to make an HTTP GET request to the path /restaurants under our base URL.
Axios' get() method returns a promise that resolves to an Axios response object. That object includes a data field containing the response body. In cases like ours where the response is JSON data, Axios will automatically parse it into a JavaScript data structure and give that to us instead of the raw text. That's the value we need, so we return response.data.
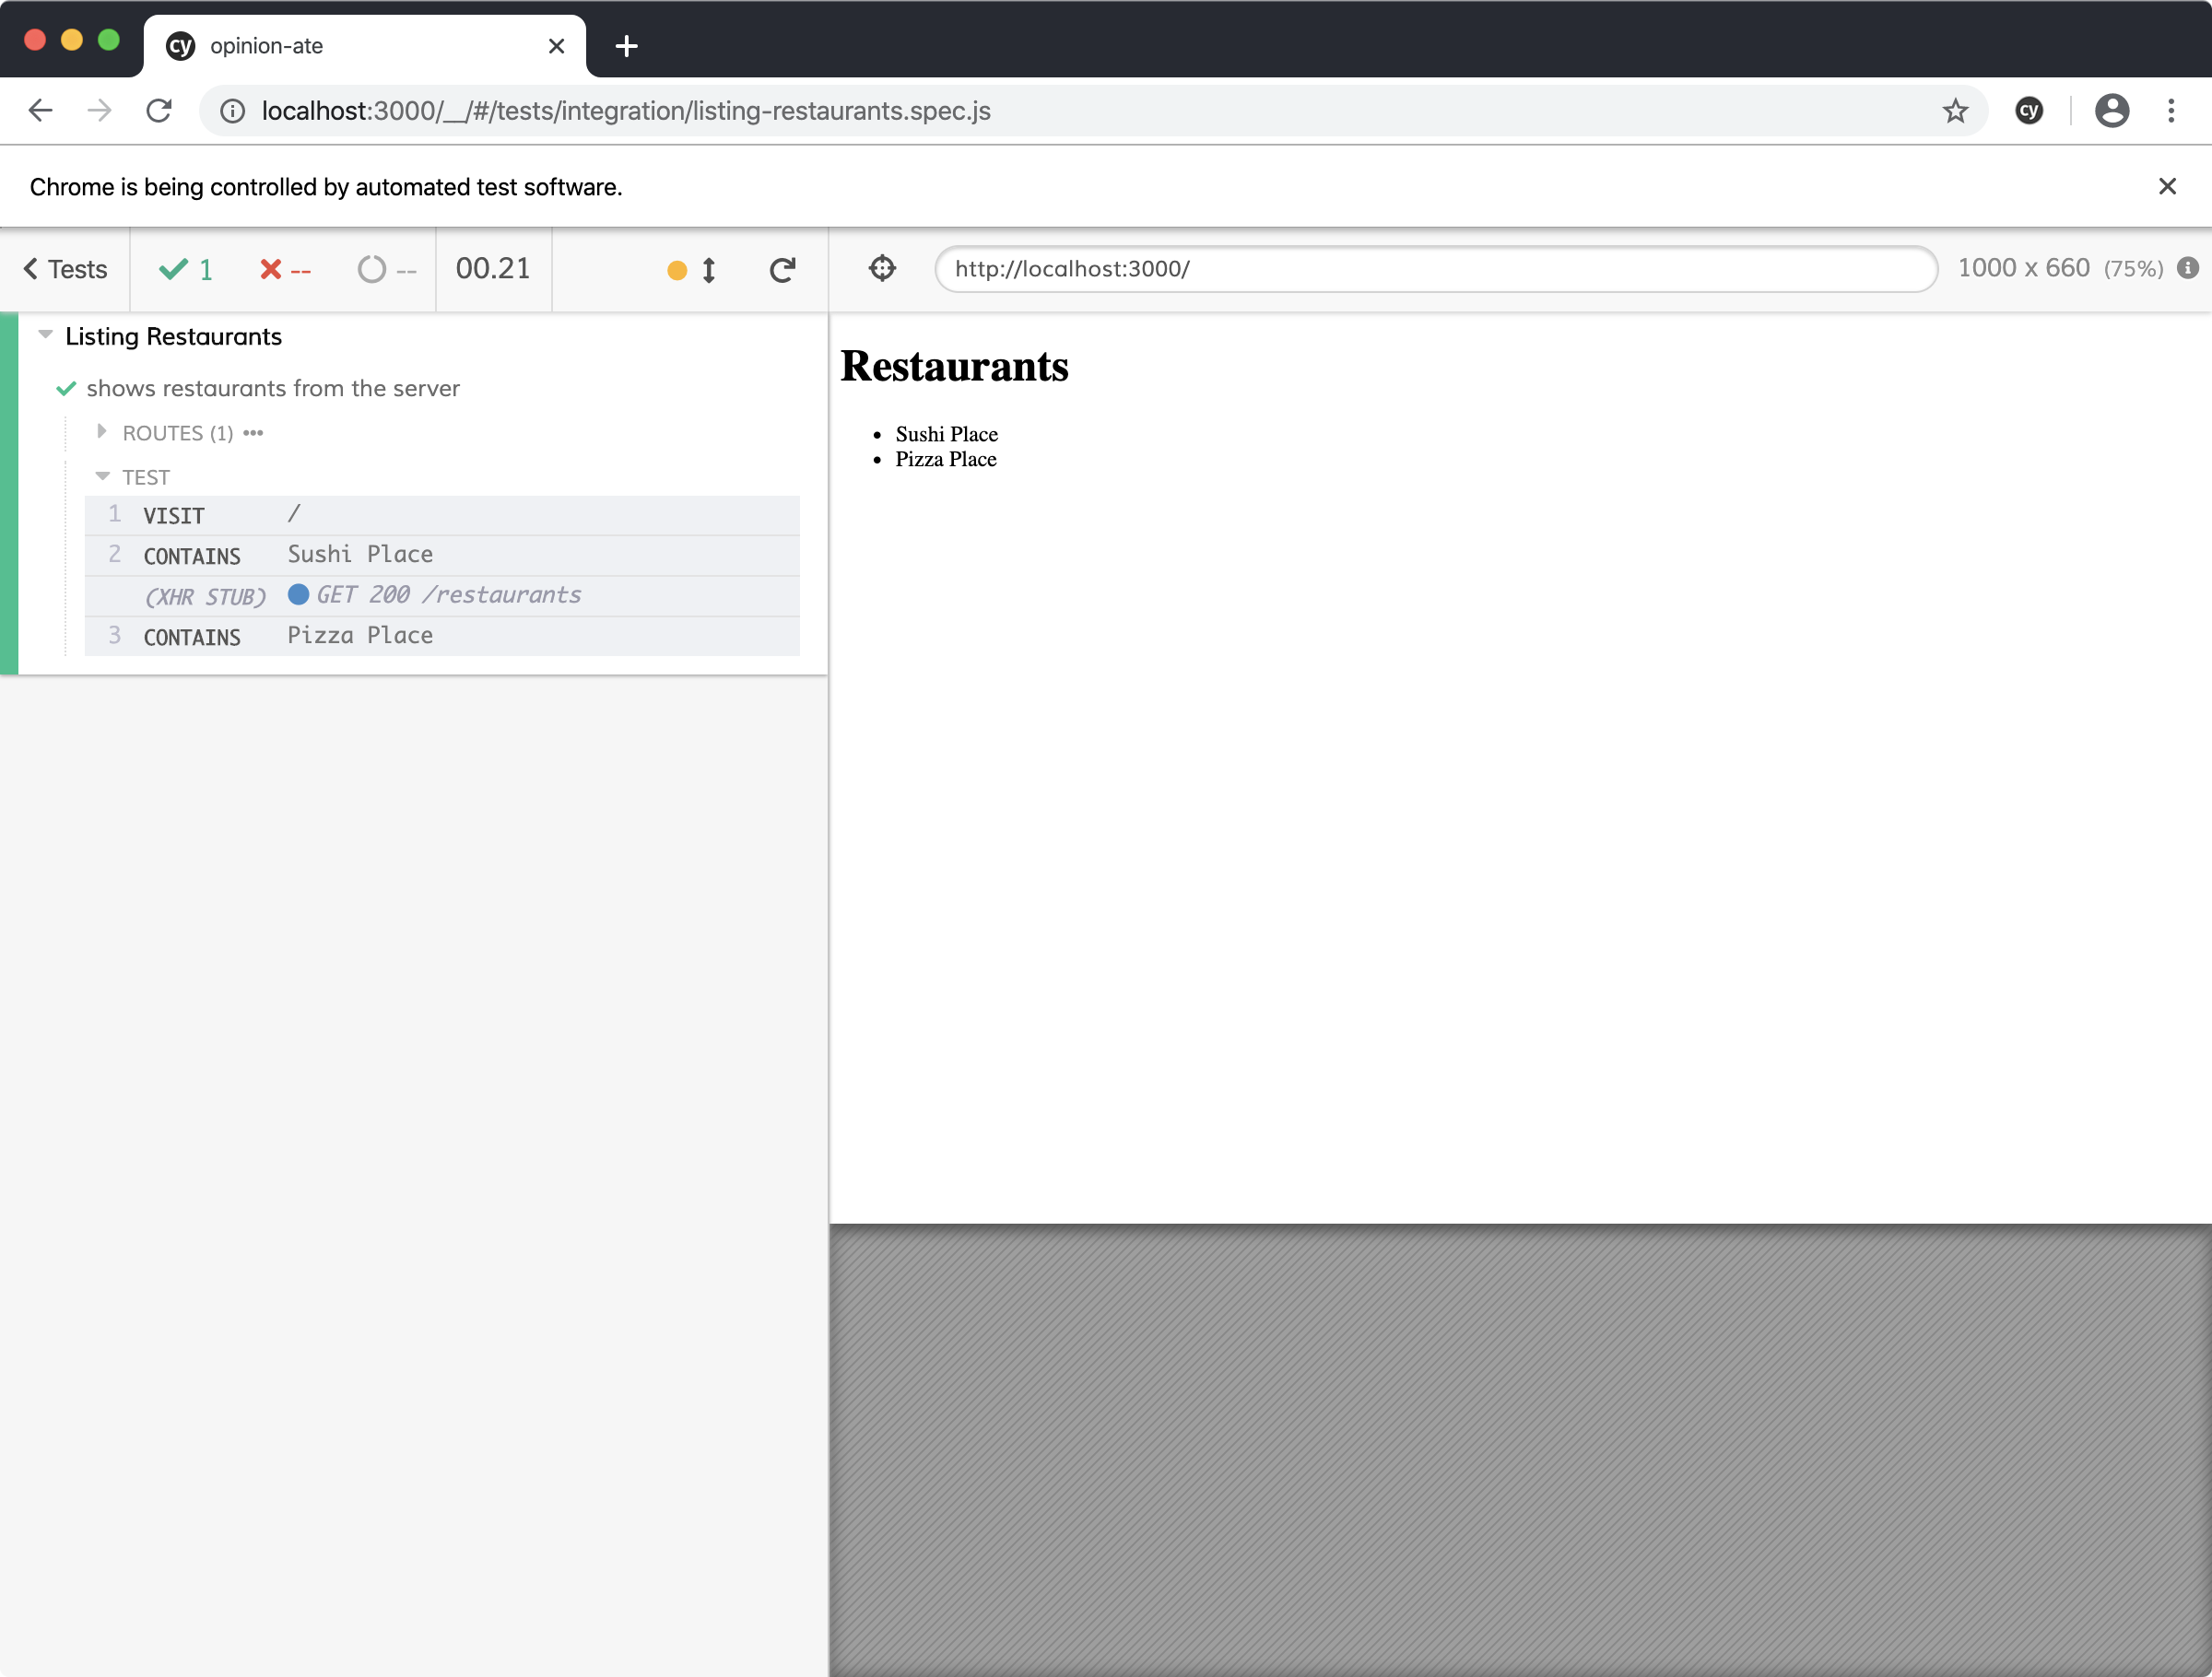
Rerun the E2E test one more time. The test should confirm that "Sushi Place" and "Pizza Place" are loaded and displayed on the page. Our E2E test is passing!
Now, let's step back to a question that came up when we started building the API client: why didn't we unit test it? It would be possible for us to set up the code so that we could pass in a test double for axios to allow us to test it. But I hesitate to do so because of a unit testing principle: don't mock what you don't own. The principle applies equally well to using any kind of test doubles for code you don't own, not just mocks. There are a few reasons for this principle:
- If you mock third party code but you get the functionality wrong, then your tests will pass against your mock but won't work with the real third-party library. This can happen if the mock initially matches the library but, later, the behavior of the library changes.
- Some of the value of unit tests is in allowing you to design the API of your dependencies, but since you can't control the API of the third-party library, you don't get the opportunity to affect the API. (Pull requests to open-source projects notwithstanding!)
If you shouldn't mock third-party dependencies, how can you test code that uses them? The alternative is to do what we did earlier in this chapter: wrap the third-party code with your own interface that you do control, and mock that. In our case, we created an api interface with a loadRestaurants() method that returns our array of restaurants directly, not nested in a response object. The module that wraps the third-party library should be very simple, with as little logic as possible—ideally without any conditionals. That way, you won't even feel the need to unit test it.
Let's see what would happen if we did try to write a unit test for api. We would need to replace axios with a test double, stubbing axios.create() to return another test double. The second test double would need to stub axios.get() to return a test response. And we would need to ensure the correct arguments were passed to each of these two methods. At that point almost the only thing the test is doing is repeating the production code, so it isn't adding a lot of value. And if Axios made a change that caused api to break, these unit tests wouldn't catch it.
Instead, it's better to test your wrapper in integration with the third-party library. In our case, our E2E tests serve this function. Because Cypress stubs out the actual HTTP request, our E2E test will only pass if api and Axios work together correctly to send the right request and provide the response data to the rest of the app. No more testing of the api is needed than that.
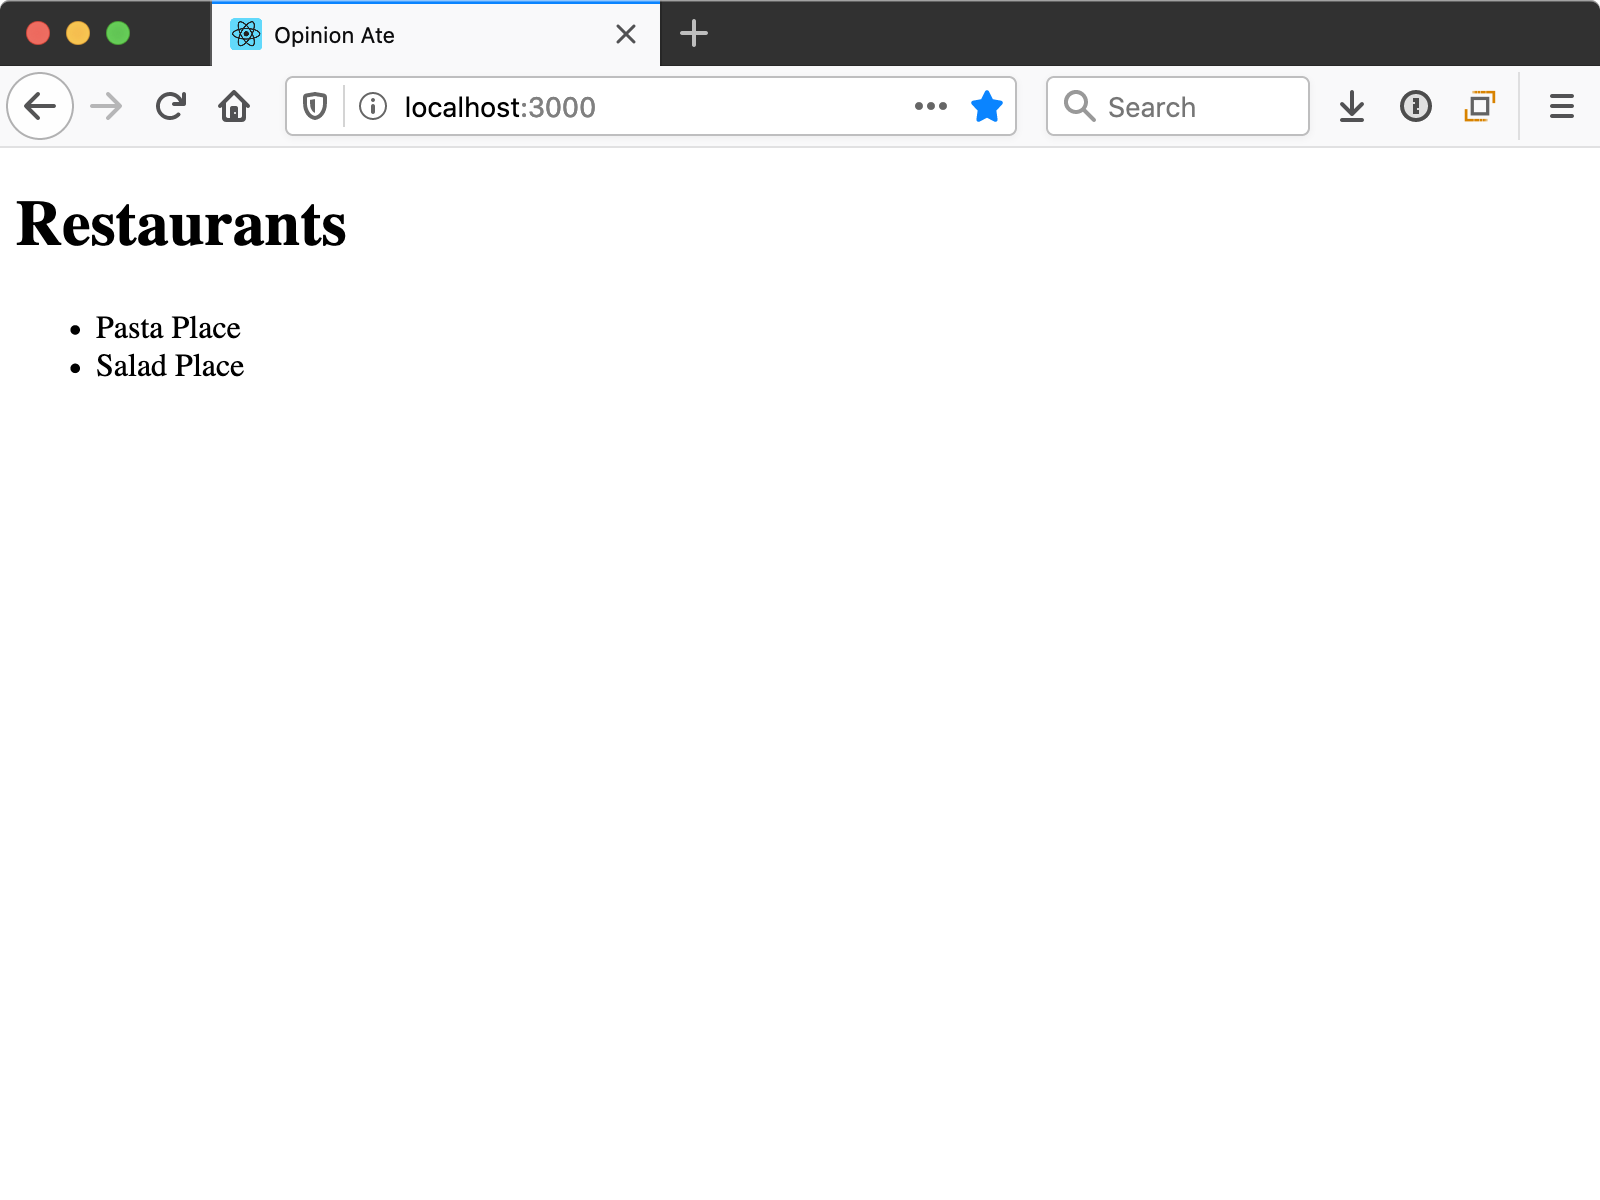
Now let's see our app working against the real backend. Go to your React app at http://localhost:3000. You should see the default "Pasta Place" and "Salad Place" records loaded from the API.
We successfully implemented our first feature with outside-in test-driven development!
Pull Request Workflow
Our feature is working locally, and now we need to get it into our main git repository and deployed. We'll do this with a pull request.
If you have any uncommitted changes, commit them to git.
Next, push up your branch to the origin:
$ git push -u origin HEAD
Click the link that GitHub provides to open a pull request. Title the pull request "List restaurants". You can leave the description field blank for this exercise; in a team context you would describe the change you made, how to manually test it, and other important information about decisions or tradeoffs you made. Go ahead and click "Create pull request".
The other thing that would happen at this point in a team context is that your team members would review the pull request and provide feedback. Often reviewers limit this feedback to pointing out problems, but there is a lot more you can do in code review. You can ask questions to better understand the author's intent. You can encourage them about decisions they made that you like or have learned from. You can make proposals for changes that you consider optional, allowing the author the freedom to choose whether to take or leave them. All of these create a code review culture that feels encouraging and motivating.
When you open the pull request, you can see CI running at the bottom. If it fails, click "Details" and check the output to see what went wrong. Try running the tests locally to see if you get the same problem; if so, fix it and push up the fix.
When CI passes, merge the pull request.
Now Netlify should automatically be deploying the updated version of our site. Go to https://app.netlify.com and check the build progress. When it completes, go to your site and see it successfully listing restaurants. It's exciting to see it live!
Some real production systems deploy on every merge like this. If you're practicing TDD, you might decide that the test coverage it provides gives you enough confidence to deploy your system on every merge. Others will not actually deploy quite as often, but they're able to if needed. An agile team is equipped to deploy as often as the business wants, which allows delivering value and getting feedback as quickly as possible.
Now we can drag our "List Restaurants" story to "Done" in Trello.
Then, locally, switch back to the main branch and pull in the the changes that have been merged in from the branch:
$ git checkout main
$ git pull
What's Next
Now our first feature is working, and TDD has helped us to start with a minimal implementation. In the next chapter we'll iterate on this implementation by adding a UI component library and improving the styling of the app.